Thursday, July 20, 2023

Now We're Just Showin' Off! Three-Hundred-Sixty Degrees.

Earlier today I installed the most recent version (1.12.0) of Luminar Neo, which included the "official" version of the Panorama Stitch extension.  If you haven't made the plunge just yet, here's good news. The promotional pricing for owners of a lifetime license has been extended a week to July 24. That's $39 for the extension.  If you don't have Luminar Neo in any form, you get to choose if and how you receive the extensions HERE. (Hint: the annual subscription is the best deal) And don't forget to use the code PHOTODAN at checkout to save an extra 10%

Business out of the way, here's how I decided to test out the official version of the extension. I found a video I shot 10 years ago at White Sand National Monument (now a National Park). I was traveling light, so shot it with my little Canon S100 point and shoot camera, and I turned a complete circle, meaning the video covered 360°!

I was not prepared for the decrease in processing and saving speed over the beta versions I had been using. From loading to saved image took less than 2 minutes. A few more minutes of editing and I had the final image you see below. 

White Sands (in the round) 2013 ©Daniel Gauss/Shot On Site

You'll have to wait a little longer for the demo of the really cool trick you can do with video clips. I either have to shoot it myself, or find a sample at the Skylum Software site, but trust me, it will be worth the wait!

Posts may contain affiliate links. If you make a purchase through one of these, I may receive a small commission at no increased cost to you. Thanks.


Monday, July 17, 2023

Panoramas From Video Clips? You Bet Your Life!


Watch this video. I shot this Sunday night with my phone, a refurbished Samsung Galaxy S10 I picked up 2 years ago from the fine folks at Back Market. Check 'em out if you hate new phone prices as much as I do.  


Anyway, the sunset was looking pretty colorful, and I needed a video so that I could demo one of the cool video tools available in the upcoming Panorama Stitch extension for Luminar Neo.  I did about a 13 second left to right sweeping pan of the western horizon, beginning at Dragon Ridge and finishing at the big mesquite tree in my yard, around a 90° angle of view.  It looks ok by itself, but what if I wanted to make a still panorama image. Well, of course I wanted that, why else would I be sitting here typing this?

I'm not going to go over the convoluted, circuitous procedure I went through to get this clip from the phone to my video folder on the desktop (it was too big to email to myself). I'll just say there were moments I wanted to punch a hole in the monitor, and leave it at that.

Once I had the video clip in the same account as the beta2 Panorama Stitch extension, it was simply a matter of dragging the whole clip to the Pano stitch window, and go through the same steps as if you were stitching several still images, except in this case, the program is looking at hundreds of frames. Once it's processed and cropped and saved, (and edited, of course), you get this:

Sunset, July 17, 2023 ©Daniel Gauss/Shot On Site

Is that not sick?? That blew my mind.  To think that I can take a video clip of just about any length, and turn it into a basically flawless panorama still image.  This is next level stuff, folks. And that's not the best part.

Is this the really cool video function I promised in the previous blog post? No, it is not. As cool as this is, it's not nearly as cool as what I'll be able to show you once the official production version of the Panorama Stitch extension is released, (and don't forget, you can save $10 if you order before Thursday, July 20).  

Can you guess what the next feature is?

Anyway, here are your purchase links again:

If you want to get your very own copy of Luminar Neo with all the great extensions, click HERE.

If you already own Luminar Neo, and want to pre-order the Panorama Stitch extension for $39 (It will be $49 on July 20), click HERE.

Current subscribers will get the extension as part of their regular subscription price.

Posts may contain affiliate links. If you make a purchase through one of these, I may receive a small commission at no increased cost to you. Thanks.


Friday, July 14, 2023

Panorama Stitching Like Never Before!


Pretty awesome this Panorama Stitching extension.  The images below were made from very old pano shoots. Kilbourne Hole (a Maar volcano crater, 1.5 miles by 2.1 miles and over 400 feet deep, and part of Organ Mountains/Desert Peaks National Monument), below, dates back to my Nikon days, and consists of 5 landscape format images. Hand held if I'm not mistaken. Back in the day, I made the pano with Photoshop Elements. It did a passable job, but was no where near as streamlined as this Luminar Neo image. Simple as loading the 5 images into the app, select them all, drag them into the Panorama Stitch window, press "Start", wait 10 or 20 seconds, and you get a pano ready for cropping, saving, and editing (if needed).

I wouldn't be me if I didn't add miscellaneous bits and bobs to my images. It's only been 3 or 4 days, but I already forgot (without looking at the original images) if this was the original sky, or if I added it because I hate an empty sky.. I think I added it. I definitely added the Red-tailed hawk😆

Kilbourne Hole ©Daniel Gauss/Shot On Site

Back in 2015, we made two amazing sightseeing trips into Mexico led from The Pink Store in Palomas, just across the border. One of the stops was the Hacienda de San Diego, below, one of dozens built and owned by "The Rockefeller of Mexico", Don Luis Terraza whose ranch was so big (7 million acres!) that when asked by someone if his ranch was in Chihuahua, replied, "No... Chihuahua is in my ranch".

This is the simplest pano on this post. Simply 3 handheld, horizontal images, taken up close with a very wide angle lens, which accounts for the curved image. The "experts" will tell you not to use wide angle lenses for panoramas for this very reason. However, I like the way it turned out. Side note: the muted pastels come from using one of Luminar Neo's awesome presets, this one called: Travelogue.

Hacienda de San Diego, Chihuahua, Mexico ©Daniel Gauss/Shot On Site

Holy Warthogs! Did I do that?? 

In 2018, Photo Bro Dale and I hiked up from Mahoney Park on the west side of the Florida Mountains. I think it was to limber up for an upcoming hike near the Gila Cliff Dwellings that turned out to not be quite as strenuous as we'd feared. Anyway, we hit this notch that looked out on the great flat flood plain that is Lewis Flats.  I found a suitable location and took 3 portrait format images to stitch into a pano. Again, the the process was much smoother than the original Adobe effort. So much so that I had extra time to add in the A-10 Thunderbolt "Warthog", just for fun. (It came from the Photo Bro's trip to a local airshow last year.)

I had to replace the sky of necessity. The sky in the  third (right hand) image was totally blown out by the sun. There was no way to retrieve any detail. A problem? Sometimes, but not this time. New sky, problem solved.

Up The Floridas ©Daniel Gauss/Shot On Site

I should point out now, if I haven't already, that I'm using pre-release beta versions of the Panorama Stitch extension. Those first three images were made with the first beta version I received from Skylum. As I've said, they all were made without a single hiccup, from existing, older, photo sets.

It was time to test the extension with some photographic heavy lifting. It was also time, against my better judgement, to brave our 105°F temps and capture my view from the yard in panoramic fashion. I set up the tripod at the fence, put the camera (Fujifilm X-T2, in raw shooting mode) on the tripod in vertical (portrait) orientation, and working left to right, fired off 20 48Mb RAF raw images. (I did make one critical error, but more on that later).

Back in the office, I loaded the 20 images into Luminar Neo, dragged them to the Pano Stitch window, and pressed: "Start".  Since all my other images were just a few jpegs I figured it would take a little longer for the magic to happen this time. And it did.. around 5 minutes in fact. I cropped the edges, was happy with the result, and hit "Save".  The little wheel started turning, and the word "Processing" appeared.  And the wheel kept turning... and turning.  After about 15 minutes I decided to go in the house and have lunch. I came back about 45 minutes later and the wheel was still going round and round and Luminar Neo told me it was still "Processing". At that point, I bailed out of the program, and prepared my feedback to the developers. In my notes I told them I gave the extension a 4/5 rating because of the failure with the raw file pano save function.

A day later I heard from them, and they wanted to see the raw files so that they could diagnose the issue. I spent an entire day on two different machines and two different internet providers trying to upload an 800Mb zip file to Skylum. Without success. 

As luck would have it, the following day, I received an email with a link to an "improved and updated" Pano Stitching beta!  I loaded it up as fast as my rural internet (TWN Communications) could handle it.. about 180 minutes for a 1.8GB zip file.  As soon as I opened the new beta, I loaded up the same 20 raw files, stitched them up, cropped, and hit "save", and waited. And I didn't have to wait long! My saved panorama showed up in the Panorama Stitch folder in about 5 minutes! So glad I don't have to figure out how to upload those files after all. And my latest feedback to Skylum? 5/5

Floridas North End in 120° ©Daniel Gauss/Shot On Site

Now, about that little mistake I made. I shot the 20 pictures in aperture priority. With this many images I should have shot in full manual, so I had a few different  shutter speeds which caused portions of the final image to be darker, specifically about a quarter of the left side. Can you see it?  You can't, can you? Because of the incredible, intuitive nature of the Luminar Neo platform it took only a few tools to fix my lighting. And of course, even though the original image had some nice clouds in the sky, I had to use a replacement over the dark portion of the sky. A small price to pay. That final image above covers about 120° angle view. I like it.  (You can see a screen shot of the post crop, pre-save image at the very bottom of this post)

If you want to get your very own copy of Luminar Neo with all the great extensions, click HERE.

If you already own Luminar Neo, and want to pre-order the Panorama Stitch extension for $39 (It will be $49 on July 20), click HERE.

And guess what? If you're a current subscriber to Luminar Neo, you don't have to click anywhere. It's already included with your subscription! It will be available on the 20th.

Don't delay, get it today!  Oh wait! I'm not done yet. Once the official release happens, I'll have a post here showing what amazing things Panorama Stitch extension can do with video clips! Yes, I said video clips, holy moly!! I've seen samples, and they're just insane!

Posts may contain affiliate links. If you make a purchase through one of these, I may receive a small commission at no increased cost to you. Thanks


Wednesday, July 12, 2023

I Can Finally Get Photoshop Elements 2018 Off My Computer!

 I'll have a full post about this soon, but I wanted to get the news out there as quickly as possible.. 

The latest Extension to the Luminar Neo edit platform is: Panorama Stitching!

I'm excited about this one. The only reason I was hanging on to PS Elements was for this function. I've been playing around with a pre-release beta version and I tell you,  it's smooth, and surprisingly fast, especially with jpegs.  

Anyway, here's the official press release with the deets. Links to pre-purchase below.


If you're a purchasing Luminar Neo for the first time, go HERE

Existing owners or subscribers use THIS LINK

As I said I'll have my samples in a new post real soon.


(Post contains affiliate links)

Tuesday, July 04, 2023

The Long and Short of It. (and an Independence Day Special!)

Ten Mile Cloud ©Daniel Gauss/Shot On Site

Both of these images were taken last night around sunset. They both began life as Fujifilm RAF raw files. But here's the difference. I edited the top image using the Essential tools in Luminar Neo, primarily Develop Raw which includes the usual tools you'd expect: exposure, shadows, highlights, curves, and so on, then added Structure (but only to the foreground, using brush mask), and Color to give some emphasis to the sunset colors, along with a slight bump of golden hour slider in the Landscape tool, and finally a vignette to complete the use of Essential tools. The entire edit took a little over 20 minutes.

But what if you're someone who'd rather be out and about taking pictures, and don't want to sit hunched over your keyboard, staring at the monitor, fiddling with sliders and keystrokes, and layers this and layers that? You're not a "professional" (or maybe you are, whatever). You just like to take pictures and you want them to look their best without wasting a lot of time with the technical stuff. Read on...

The bottom image took about 90 seconds from start to finish. One click on one of the Presets that are included with Luminar Neo... in this case I picked the "Clear and Sharp" preset from the "Essential Presets" pack. One click and it was near perfect. I opened the Develop tool and lifted the foreground shadows slightly, then painted a bit of extra Structure into the mountains. I opened the EnhanceAI tool and moved the slider just enough to activate the Sky slider to pop the clouds. Finally put in my "DG" signature layer and it was done. A completed edit in under 2 minutes. What's not to like? How about this: if you have several similar images taken at the same time, you can just right click on the edited image, select "copy adjustments", then highlight the new images, right click, select "paste adjustments", and Voilà! You might want to make some minor adjustments, but for the most part all your other images are edited, and ready to share to your online platforms, sent to the printer, or whatever floats your boat.

Now, jump below for a news flash...

Floridas ©Daniel Gauss/Shot On Site

 The Luminar Neo Summer Sale may be over, but that doesn't mean there's not another super offer out there.  Maybe some of you are aware that Skylum, the company behind Luminar Neo is located in Kiev, Ukraine. The fact that they can keep putting out this fantastic product and keep it updated in the middle of a war is nothing short of amazing. Obviously, independence is near and dear to them. They're also aware that it's our Independence Day in America, and in that spirit we have an Independence Day Promotion! ðŸ‘ˆ (that's the link!). Get the Ultimate Plan Subscription for only $39 for the first year (rebills annually at $119). This price also includes 2 gift Preset Packs (remember what you learned about the Presets up there!☝).  I'm not sure if you can save an extra 10% with my checkout code, but it's certainly worth a try, right? Here it is: PHOTODAN

This promotion ends on Thursday morning (the 6th) at 7AM EDT!


Posts may contain affiliate links. If you make a purchase through one of these, I may receive a small commission at no increased cost to you. Thanks.


Thursday, June 29, 2023

Time's Running Out.


Stranger Things, Deming, ©Daniel Gauss/Shot On Site

Hey friends, the big Luminar Neo Summer Sale ends really, really soon. Like tomorrow, (6/30/23) at 7:00AM EDT! Reminder: Best prices on the most fun, creative editor since Black Friday last year. If you, like me, find Adobe too technically challenging (and expensive!), you owe it to yourself to go give Luminar Neo a risk-free try! And don't forget, you can save an additional 10% with my special code, 

AFS-rdFDRy

when you check out. Time to finally have fun with your photography! Click below:


Huh. It doesn't look so scary in the daytime.

Un-strange Things, Deming ©Daniel Gauss/Shot On Site


Fine Print:

Posts may contain affiliate links. If you make a purchase through one of these, I may receive a small commission at no increased cost to you. Thanks.

Sunday, June 25, 2023

It's Your Choice


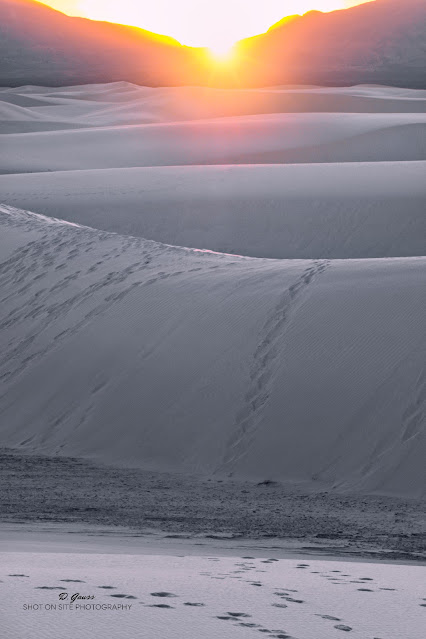
White Sands Golden Hour ©Daniel Gauss/Shot On Site

As a photographer, I tend to classify myself as an "opportunistic generalist". What does that mean? Simply that I'll shoot anything! Landscape, wildlife, street, portrait, pet, event, ruins, whatever. There's a hashtag on social media: "ipulledoverforthis". That's me in a nutshell. That doesn't mean I don't have my favorites, landscape photography being probably at the top of the list.

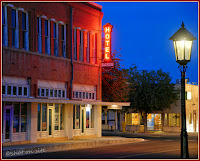
Baker Blue Hour ©Daniel Gauss/Shot On Site
That said, it's uncommon for me to actually plan out a photo shoot. I've done it a few times, possibly the first being the HDR session in downtown Deming, NM that resulted in one of my most commercially successful images (a framed enlargement hangs in a villa in the south of France!), that being the Baker Hotel sign in blue hour. This was planned out weeks in advance. 

But for the most part, I'll just grab the camera and go. Oh, there's a car show in town? I'm on that. Full moon coming up over the mountains in the back yard. I'll shoot that. Look! Look there at that old car in the yard of that abandoned house. Get the shot! 

You getting the picture? 

So anyway, some time back in January, I decided I wanted to shoot the full "Snow" moon rise, and I wanted to use the PhotoPills app to get the right time and location.. and that location was going to be White Sands National Park! In other words, a meticulously planned photo shoot! It happens sometimes.

Photo Bro Dale and I got a late start on February 5, but it didn't matter much... everything we were going for was happening late in the day. The moonrise for me, and a very short time before, the sunset for Dale. I was planning on getting some sunset images myself.

Typically, there wasn't a cloud in the sky when we arrived. We hung around the visitor center for a while, flirting with the ranger on duty, then headed out to stake out our spots. I tried out a couple dune tops, took some basic White Sands landscapes, but I didn't like the way the light was going to act when the sun started to set. I hiked to the hill Dale was set up on about the time the sun began to dip. 

There was still almost an hour before the moon would show itself above the Sacramentos, so I set up my tripod and aimed the camera towards the a notch in the San Andres Mountains where the sun would descend. I decided on portrait mode because it accentuated the layers of dunes between my location and the mountains. Then, well, then I just shot the hell out of it while the sun did its disappearing act.

Being a little unprepared clothing-wise for nighttime in the desert, we decided we couldn't stay where we were to shoot moonrise. We rushed back toward the parking lot to set up there.

But hey, if you looked at the image that leads off this post, you've probably figured out by now that this isn't about the moonrise. It's about the sunset, and what I chose to do with it.  

Back home again the following day, I opened up Luminar Neo on the ol' desktop and commenced to editing. When I got around to the sunset shots, I chose the image at the top of this page. I only needed basic edits.. a little masking to bring out the pinkish tones of the dune ridges, brought up the whites in the develop tool. A very minor vignette to direct the viewer's eye. And that was pretty much it. Or was it?

Revisiting the image a day later, I decided that while it was a nice landscape, it was pretty pedestrian; certainl y not one I would put on a notecard and sell at Readers' Cove (our used book store), or the Arts Center.  But I had a plan...

One of the things I really like about Luminar Neo is that I can create fantasy images, and do it way easier, and more intuitively than with those other guys.  More than a year ago I'd gotten this PNG butterfly layer as a gift from Luminar, for completing a survey or something. I tried it out. I liked it, but I wanted to fill the page more, so I loaded another copy and added it, then flipped it so it wouldn't be an identical duplicate of the first layer. I then lightened up the top third of the layers using the mask tool, so it appears the sun is shining through the wings. I sat back feeling pretty damn satisfied with myself.  When printed on metallic surface paper this should pop! I'll know this week when my latest print order arrives at the Homestead.


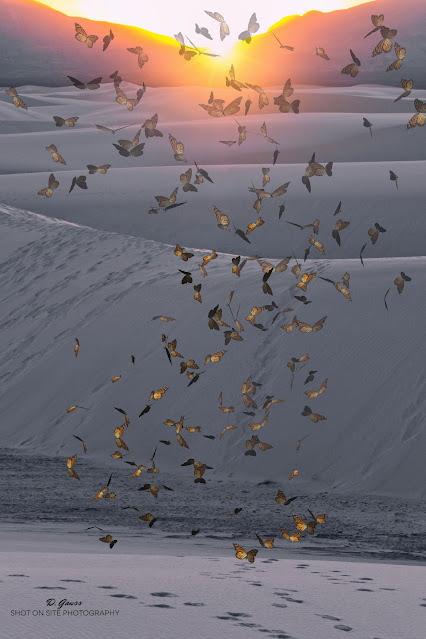
White Sands Golden Hour Fantasy ©Daniel Gauss/Shot On Site

I didn't have to do it this way, but I chose to. It was my choice. You might not do this with your images. I know a lot of my friends have no interest in these flights of fantasy, and that's their choice. Just like it's your choice. What would you do if you had these creative tools at your fingertips?

Right now, is the very best time to find out, because Luminar Neo Summer Sale is on till the end of the month! These are some of the lowest prices since way back at Black Friday in November. There's no risk.Try it, and if you don't love it like I do get your bucks back. And I can sweeten the pot, because I've got a special code you can copy and paste at checkout, and get an additional 10% off! 

Here's the code right here: AFS-rdFDRy

Just click the ad below, or any of the other links in the post to hit the info page. It's time you tried it, guys. Prices probably won't be this low again... new features are coming later this year!


Oh! And what of that full "Snow" moon rise that was the whole purpose of this "Photo Bro's Roadtrip"? I got it. And you can see it on my Instagram, when you  go there to follow me. 😎


Fine Print:
Posts may contain affiliate links. If you make a purchase through one of these, I may receive a small commission at no increased cost to you. Thanks.