Since 2009, the retirement home of Shot On Site Photography... the source of the finest sighthound performance images in the world. As of August 1, 2022, the blog will become much more photo-centric. Not only will I post images from the homestead in the foothills of the Little Florida Mountains, and surrounding environs, but also tips about shooting, editing, archiving, software, hardware and more. The political rants will become few and far between (but not eliminated! It is 2022 after all!)
Thursday, June 25, 2026
Secret Sale! (And a fun head shot project)
Friday, August 15, 2025
"Luminar Ecosystem"?
What's that all about? Let's find out...
There's a big, new upgrade coming in November 2025, which Skylum are calling the "first phase of the Luminar Ecosystem". Let's keep it simple, shall we? Bullet points👇
- Cross-device Mobile to Desktop editing. Currently you can use Luminar Mobile to edit your phone images, and/or Luminar Neo to edit your camera and phone images, but the two platforms can't communicate with each other. That will change in November... start your edits on the mobile platform on the road, complete them on your desktop when you get home. Details in November.
- Web Galleries. This one excites the hell out of me. Almost the most exciting upgrade in the bunch (but not quite... you'll see). You'll be able to turn your edited images into a curated web gallery with just a few clicks, and you don't have to know crap about web publishing. I will be doing this as soon as I have this update in my grubby little (bigger than T*ump's, though) hands. Again, more info as November draws nearer.
- Restoration. Exactly what it sounds like, and if you're like me, you've got thousands of old prints around, from dozens of different decades (including before you were born, of course), that are just fading and crackling away before your very eyes. This is the one I really, really like. Can't wait to check it out.
- AI Assistant. (??!!) In the words of Ryan Hall Y'all, "don't be scared, be prepared". Not all "AI" is scary. The "assistant" analyzes your photos and recommends optimal edits, streamlining your editing flow. You might think this is only for beginners, or newbies to Luminar, but you can bet I'll use it, because it will make a lot of the tools like Curves, and Color Harmony- tools that I've been reluctant to use because they look daunting- easier to use than ever.
- Volume. Crank it to 11? This is the mystery upgrade, and I'm as in the dark as all the YouTube influencers touting this upgrade I've watched this morning. Sounds tantalizing, though. What they say:
"Instantly add depth and dimensionality by enhancing light and shadow. A one-click solution to elevate contrast and visual impact — no manual Dodge & Burn needed."
So, you may ask, if this is all happening at the end of November, why, Dan, are you giving us all this information now? Glad you asked, and the answer is simple: There's EARLY BIRD PRICING! 👈That's your link. Hit that mother and go see what the folks at Skylum/Luminar have for you! You won't be disappointed, (and if, for some reason, you are? You got a week or something like that to get your money back. So, try it risk-free). And don't forget my discount code: PHOTODAN. Join me on this exciting photo editing journey!
Bold Print (Not "fine" print): There are a limited number of licenses available for this offer, and the early bird pricing is only available until August 31, 2025. Activate your FOMO now!!
Friday, June 28, 2024
A Purty Pickshur? No, no, no... it's APERTY
Folks, I'm not a "landscape photographer", but I take landscape images. I'm not a "street photographer", but I have taken many images that would be considered "street" photography. I'm not a "nature photographer", but I've shot many'a birds, mammals, reptiles, amphibians, and fish. Fish? maybe I haven't shot a lot of fish. But you get the picture (metaphorically speaking). I'm not one to be defined by labels.
So, when I say, I'm not a "portrait photographer", I have certainly taken many portrait photos, going back nearly 60 years. But do I make a living as a portrait photographer? Certainly not. But there are those of you reading this, (and I'll make sure you see this and read it), and do I have an exciting bit of news for you!
And it's called Aperty It's a brand new editing program from Skylum, the makers of Luminar Neo. This is no tool added to Luminar Neo, uh-uh, this is a brand spanking new, stand-alone editor, created by Skylum specifically for portrait photographers!
Details can be found in the May press release from Skylum, which you can read in full here, but for you, who are always in a rush, here are the highlights:
What? You're not interested in making great portrait photos, or any great photos? Well someone you know does. Copy this post link and share it with all of your photographer friends. They'll thank you later.
Ciao!
Tuesday, February 06, 2024
An Offer For Budding Landscape Photographers...
- 5 presets/templates with a countryside aesthetic
- 5 of the same presets with added clouds (meh)
- 5 sky replacement images with different clouds and moods
- 5 LUTs (Lookup Tables) with different cinema-type color grading
- 5 bokeh and flare-type overlays
- 3 fog overlays
- 1 professional editing guide with instructions and tips for making images your own
![]() |
| Whitewater Creek at Catwalk, ©Daniel Gauss/Shot On Site |
Wednesday, August 16, 2023
Let's Say I Had This Friend....
...and this friend, knowing I was pretty good at photo editing, asked if I could do a favor for him. See, this friend is roughly the same age as I am, and like me is into photography (but not quite as seriously as I) and way back (let's say in the mid-to-late 1970s) he took a lot of photos of the, um, boudoir genre.
When I saw what I was going to be working with, I wondered what I what I'd gotten into. The original prints looked like they had been in ̶m̶y̶ his drawer for the last 45 years. And they were tiny! 3.5 x 5, silk surface paper, with round corners! Remember those?
And check out those colors! Jaundice city! This was not going to be the easiest project I ever took on. But... I had a secret weapon! Oh yeah, Luminar Neo had all the tools I needed to fix the colors, remove the annoying silk texture, and make a much larger image file using UpscaleAI.. from 40KB to 3MB with the click of a button. I had not done this kind of work, ever, and yet Luminar Neo is so intuitive (and quick) that it was easy to figure out what tools would do what. And of course, if I didn't like a result, it's simple to back out, with no effect on my original image file because as I may or may not have harped on many times, Luminar Neo (in fact all the previous versions of Luminar as well) is a totally non-destructive process. No matter how many changes you make to an image, your original file is untouched. Cool huh?
And then, there was Studio Lighting. I had, in my possession the beta version of the upcoming feature, Studio Lighting, which will show up in the Portrait Tools on the next update around the end of this month. It allows you to re-create many dramatic lighting lighting effects heretofore only available using actual, you know, studio lighting. I actually found this fairly daunting, because there were so many controls and I just had to fiddle around with each one to see what they would do (remember "non-destructive process?" Good thing).
In the end I ended up with a simple "stripe" lighting effect, (think sunlight through vertical blinds). Just the right "punch". Added a simple vignette, and called it "done". I'm pretty happy with the result. Pretty sure you'll agree, the final image is a far cry from where I started. This is easily the most accurate color I've gotten from faded and color-shifted old prints or slides. Now that I know what's required, I might work on more of ̶m̶y̶ his old photos!
Now, after the image, I'll fill you in on all the exciting new updates and extensions coming this autumn from Skylum and Luminar Neo....
![]() |
| Famous Fujifilm Kimono ©Daniel Gauss/Shot On Site |
As I mentioned above, Studio Light will be available on August 31, but you can get early bird pricing for all Luminar Neo platforms starting now through August 27th. Here's the deets:
New purchasers have a choice of:
- the brand new Pro Monthly subscription, $14/mo
- Pro 12 Month subscription, $99 instead of $119
- Pro 24 Month subscription, $139 instead of $179 👈 (Best deal, of course)
- New Lifetime purchasers (if you'd rather pick and choose your Extensions) $249 instead of $279 (Trust me, the subscription model is the way to go)
If you're an existing Lifetime user, you might want the 2023/2024 Creative Journey Pass for $39 instead of $79. You will need this to get the next update with Studio Lighting.
There's so much more to come this Fall, and I'll tell you all about it the very next post! But for now, to take advantage of the early bird prices click on this. And remember, to use the code: AFS-rdFDRy at checkout to save an additional 10%! (PHOTODAN may work as well and you won't have to cut and past, or try to remember that first one)
Here's more samples (by other folks) of Studio Lighting tool...
Posts may contain affiliate links. If you make a purchase through one of these, I may receive a small commission at no increased cost to you. Thanks.
Sunday, June 25, 2023
It's Your Choice
![]() |
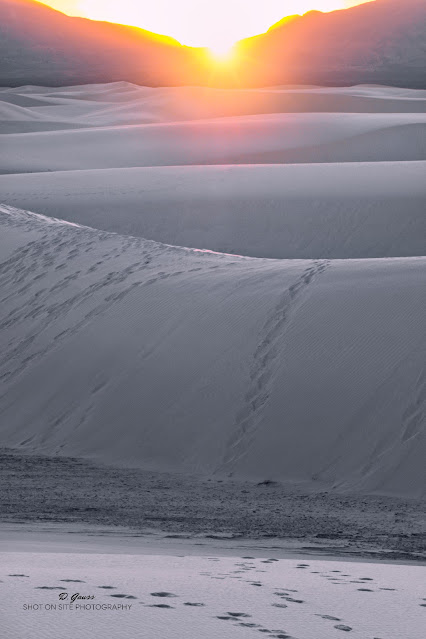
| White Sands Golden Hour ©Daniel Gauss/Shot On Site |
As a photographer, I tend to classify myself as an "opportunistic generalist". What does that mean? Simply that I'll shoot anything! Landscape, wildlife, street, portrait, pet, event, ruins, whatever. There's a hashtag on social media: "ipulledoverforthis". That's me in a nutshell. That doesn't mean I don't have my favorites, landscape photography being probably at the top of the list.
![]() |
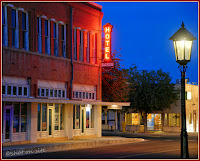
| Baker Blue Hour ©Daniel Gauss/Shot On Site |
But for the most part, I'll just grab the camera and go. Oh, there's a car show in town? I'm on that. Full moon coming up over the mountains in the back yard. I'll shoot that. Look! Look there at that old car in the yard of that abandoned house. Get the shot!
You getting the picture?
So anyway, some time back in January, I decided I wanted to shoot the full "Snow" moon rise, and I wanted to use the PhotoPills app to get the right time and location.. and that location was going to be White Sands National Park! In other words, a meticulously planned photo shoot! It happens sometimes.
Photo Bro Dale and I got a late start on February 5, but it didn't matter much... everything we were going for was happening late in the day. The moonrise for me, and a very short time before, the sunset for Dale. I was planning on getting some sunset images myself.
Typically, there wasn't a cloud in the sky when we arrived. We hung around the visitor center for a while, flirting with the ranger on duty, then headed out to stake out our spots. I tried out a couple dune tops, took some basic White Sands landscapes, but I didn't like the way the light was going to act when the sun started to set. I hiked to the hill Dale was set up on about the time the sun began to dip.
There was still almost an hour before the moon would show itself above the Sacramentos, so I set up my tripod and aimed the camera towards the a notch in the San Andres Mountains where the sun would descend. I decided on portrait mode because it accentuated the layers of dunes between my location and the mountains. Then, well, then I just shot the hell out of it while the sun did its disappearing act.
Being a little unprepared clothing-wise for nighttime in the desert, we decided we couldn't stay where we were to shoot moonrise. We rushed back toward the parking lot to set up there.
But hey, if you looked at the image that leads off this post, you've probably figured out by now that this isn't about the moonrise. It's about the sunset, and what I chose to do with it.
Back home again the following day, I opened up Luminar Neo on the ol' desktop and commenced to editing. When I got around to the sunset shots, I chose the image at the top of this page. I only needed basic edits.. a little masking to bring out the pinkish tones of the dune ridges, brought up the whites in the develop tool. A very minor vignette to direct the viewer's eye. And that was pretty much it. Or was it?
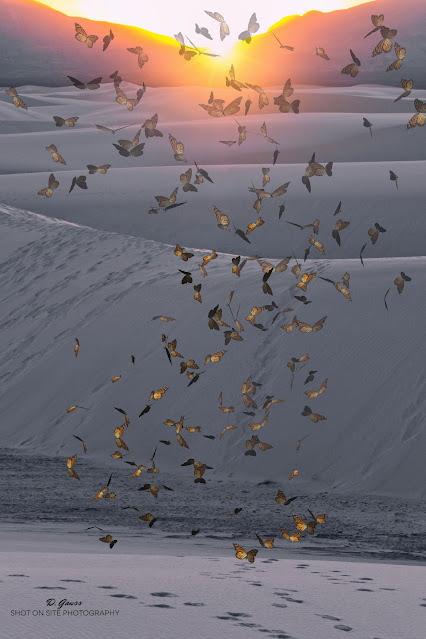
Revisiting the image a day later, I decided that while it was a nice landscape, it was pretty pedestrian; certainl y not one I would put on a notecard and sell at Readers' Cove (our used book store), or the Arts Center. But I had a plan...
One of the things I really like about Luminar Neo is that I can create fantasy images, and do it way easier, and more intuitively than with those other guys. More than a year ago I'd gotten this PNG butterfly layer as a gift from Luminar, for completing a survey or something. I tried it out. I liked it, but I wanted to fill the page more, so I loaded another copy and added it, then flipped it so it wouldn't be an identical duplicate of the first layer. I then lightened up the top third of the layers using the mask tool, so it appears the sun is shining through the wings. I sat back feeling pretty damn satisfied with myself. When printed on metallic surface paper this should pop! I'll know this week when my latest print order arrives at the Homestead.
![]() |
| White Sands Golden Hour Fantasy ©Daniel Gauss/Shot On Site |
Here's the code right here: AFS-rdFDRy
Just click the ad below, or any of the other links in the post to hit the info page. It's time you tried it, guys. Prices probably won't be this low again... new features are coming later this year!
Monday, May 15, 2023
A Tale Of Two Images
![]() |
| The False Slot - ©Daniel Gauss/Shot On Site |
Friday, January 13, 2023
Happy (Belated) New Year!
![]() |
| Immature Bald Eagle ©Daniel Gauss/Shot On Site |
This young bird may be experiencing its first new year. Shot this at Bosque del Apache National Wildlife Refuge on Christmas Day, a trip we've been making nearly every Christmas for the last 6 or 7 years. "The Bosque" is one of America's great wildlife refuges, and should not be missed.
You would think, looking at this image, that I was either very close, or I have one of those massive multi-thousand dollar telephoto lenses. Neither is the case. My lens of choice (currently) for wildlife images such as this is the Fujifilm XF 50-140mm f2.8 R LM OIS WR (a mouthful, right), coupled with the Fujifilm 2x teleconverter. The 35mm equivalent of this setup would be 150-450mm. Decently long, but not enough to get in close to this eagle. Here's the original, uncropped and unedited image (about 50-60 yards away):
![]() |
| ©Daniel Gauss/Shot On Site |
So... how did I get a nice close (and sharp) image? Well, if you've been coming around here long enough you won't be surprised when I tell you it was in the "digital darkroom" with Luminar Neo!, and its group of Extensions. (Especially SupersharpAI and UpscaleAI). If you own, or have a subscription to Luminar Neo and you want to try out any of the extensions for free, just click on any of those last 3 affiliate links. To purchase Luminar Neo, click on the first link. And don't forget: if you decide to purchase anything at the Luminar site, use the code: PHOTODAN for 10% off of your purchase!
I'll be back soon, with more cool content about photography, photo editing, activewear clothing, your feet, and some exciting new medical news. Hang in there.
Monday, November 14, 2022
Feel Free to Augment Your Reality
![]() |
| Dogs,2003, and a Bridge, 2021 ©Daniel Gauss/Shot On Site |
The folks at Skylum Software, just released a buttload of new extensions for their Luminar Neo editor. Some practical (I'll get to those in a future post), and some fun and creative. Background Removal AI falls solidly in the latter category. Take the above image for example. If you've got your readers on and can read the small print you'll see the dogs' picture was taken 19 years ago at a dog camp in Asheville. The bridge was shot last Thanksgiving at the Nature Conservancy's Iron Bridge Conservation Area northwest of Silver City, New Mexico.
This screenshot from the Luminar Neo desktop shows the steps (though not in process order) I took to get from there to here... upper right is the original Nikon D1H raw file from 2003. Bottom right is the background removed, with a single click and a bit of fringe work around the ears, Bottom left converted to a png file with a transparent background, where it is then ready to be inserted into another background. Notice that I needed to flip the dogs so the light direction was consistent. Also a single click. Spent about 10 minutes total. Obviously more can be done, but I wanted to get the news out.
Friday, November 11, 2022
Luminar Neo Evolution Continues... Better Than Ever
Here's the official tease. I'll have more on the new extensions very, very soon. Or hit the ad on the right.
Sunday, October 30, 2022
Customizing My Old Images. Because I Can
![]() |
| Cody, Nebraska 2008. ©Daniel Gauss/Shot On Site |

![]() |
| Cody, Nebraska 2008 "Fall Edit" ©Daniel Gauss/Shot On Site |
![]() |
| Cody Nebraska 2008 (Black and White Edit) ©Daniel Gauss/Shot On Site |
Thursday, October 27, 2022
The Value of An Evolving Editing Program (to me, anyway)
![]() |
| Race Day Morning.2008 NOTRA Nationals, Boswell OK ©Daniel Gauss/Shot On Site |
Tuesday, October 18, 2022
It Was the Mother of All Crepuscular Ray Sunsets
![]() |
| Original Fujifilm X-E3 Raw File: f8, 1/800 second, ISO 400. Fujifilm XF 16-80mm f4.0 R OIS WR zoom at 18mm. |
Now, crepuscular rays are not an uncommon site here in The Land of Enchentment, but this was notably exceptional in that the rays were directed out in all directions, owing to the broken cloud formations, and the elevation of the setting sun.
I grabbed the X-E3 and stationed myself on the front porch for the next half hour or so, snapping picture after picture after picture.
I was hoping to get into the editing later that evening, but life - as it does- got in the way, and I didn't get to it until Monday. The screen grab above is the Fuji RAF raw file I started with when I opened up Luminar Neo and sat, staring at the screen, wondering how I wanted to proceed.
I'd watched a YouTube video a couple days before, by a Luminar ambassador, Jim Nix, edit a very similar image, using some of the seldom used tools in Luminar Neo. That's the direction I decided to go.
While Luminar Neo has a very cool "Sunrays" tool, it was obvious it wouldn't be necessary with this image. But I wanted to really accentuate them, along with the golden hour colors. Recently, I would have run this through the HDR Merge tool, just to see what it would look like, but I decided to forego that step. The tools I did use included the almost obligatory DevelopRAW, NoiselessAI, Structure, Color, Super Contrast, among the usual suspects. The seldom used tools included Toning, and Color Harmony.
The beauty of any of the Luminar platforms is that they are completely non destructive. You can experiment with any number of the tools, jack the sliders up to 100, play with colors, vignettes, details, etc. and in the end if you're not happy you can revert to your original raw file or jpeg and it's completely unchanged, and ready for you to start over. I've been there.
Anyway, without further ado, you're probaby interested in seeing how it ended up after using 12 different tools (some more than once, which is another cool feature of Luminar Neo). Here's the shot:
![]() |
| "From the Porch", ©Daniel Gauss/Shot On Site |
Remember, if you're interested in any of the Luminar products, use the links above, and if you decide to buy, save $10 with my coupon code: DANGAUSS
Friday, September 30, 2022
Money Money Money Money..... Money (hum it with me)
Just a quick addendum to yesterday's post on the new Luminar Neo pricing programs. You can take an additional $10 off, using my personal discount code: DanGauss if you purchase a 1 year subscription of either Pro or new Explore! You're welcome.
BONUS POST:
And here's a teaser of an upcoming extension-
Monday, September 05, 2022
Br-r-r-r-r-ackets!
![]() |
| Upper Gallinas Campground, Gila National Forest. New Mexico, USA ©Daniel Gauss/Shot On Site |


.png)


.png)


