Showing posts with label Landscape photography. Show all posts

Tuesday, February 06, 2024

An Offer For Budding Landscape Photographers...

...and even for those who think they're accomplished. Like me.

Those rascals at Skylum Software have an offer for you, in the form of a comprehensive Countryside Landscape Kit for Luminar Neo, at a 35% discount. (Regular price $39). What's in it? Glad you asked.

  • 5 presets/templates with a countryside aesthetic
  • 5 of the same presets with added clouds (meh)
  • 5 sky replacement images with different clouds and moods
  • 5 LUTs (Lookup Tables) with different cinema-type color grading
  • 5 bokeh and flare-type overlays
  • 3 fog overlays
  • 1 professional editing guide with instructions and tips for making images your own
Naturally, I received a sample copy to play with so's I can show you what can be done with these tools. The image below was created with a handful of the above features, and many, many of the native editing tools in Luminar Neo. (The original JPG image is at the bottom of the page)


Whitewater Creek at Catwalk, ©Daniel Gauss/Shot On Site

Of course you have to already own a Lifetime version, or an active subscription to Luminar Neo to take advantage of this offer, or for any of the other thousands of creative solutions available in the Luminar Neo Marketplace. 

And if you're not? Well have I got a deal for you! Through Valentine's Day (February 14) you can purchase any Luminar Lifetime of Subscription package for 30% off. Just use this here link.  

And to get the Countryside Landscape Kit at 35% off, use this here link! Yes, the links are different. (Also, you might try the coupon, PHOTODAN, at checkout and you may just get an additional 10% off, but I'm not making any promises about that).

And here's what I started with:


Notice the heavy black shadows in the lower left and upper right. If I recall, the lens hood was cockeyed and I didn't catch it for for several frames. Here was a case where one of the new generative AI tools came in handy: GenErase fixed it right up.

So you ready to buy ya some Luminar Neo or what? C'mon now...


Monday, May 15, 2023

A Tale Of Two Images

The False Slot - ©Daniel Gauss/Shot On Site

"False Slot"? This is nowhere as big as it looks. A kind of optical illusion, if you will. It's actually a massive boulder immediately north of the Pony Hills Petroglyph site in Luna County, New Mexico. Sometime in the distant geologic past it had broken into two parts. In reality, what looks like a one hundred foot long slot is closer to 20 or 30 feet, and about 12 to 15 feet high, and let's just say way too narrow for a slightly plus-sized septuagenarion like myselft to traverse. So,  kind of an entertaining illusion, right?

I wasn't sure the image above was going to come together. I had taken the two images below, with slightly different exposures, trying to get something that was balanced. I wasn't crazy about either, but I decided I would see what I could do with it back home at the computer. 

 
By now, you know that my editor of choice is Luminar Neo, and I was just itching to get this into the HDR Merge extension. There was a problem, though. These two images were just hand held. I did have my tripod with me, but pure laziness on my part kept me from setting it up.  As a result, when I pulled the two images into the HDR Merge extension, I had to opportunity to try out a function of the tool I hadn't needed in previous images:  Auto alignment.  Turns out it works pretty damn well. As you can see from the third image below which is a composite of the two images at 50% opacity, they weren't lined up very closely at all. Compare it to the finished image at the top of the page, and it put them together nearly perfectly. I say "nearly" because while the viewer will not see any fine details that didn't quite mesh, I can. I can always see the faults.  It's my curse. 😐


Have a look at the top of the right sidebar, and you will see an ad for the Mothers Day Sale, which has just a few more hours to run... till 7:00 AM EDT, May 16 to be precise. If you look and the ad's no longer there, you missed out again. 50% off. Or 60% off if you also use the code, PHOTODAN at check out. Later, all.


Sunday, October 30, 2022

Customizing My Old Images. Because I Can

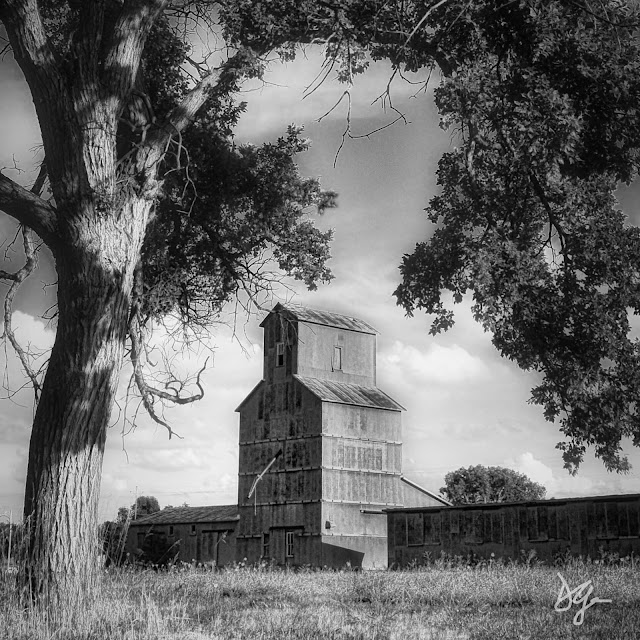
Cody, Nebraska 2008. ©Daniel Gauss/Shot On Site


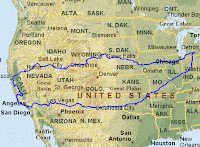
Back in 2008, we embarked on one of our longest trips in the Hare-Brained Express, leaving Ann Arbor, where Margaret's brother installed a new radiator in the Bounder, for the west coast and back again. That trip was chronicled extensively on this blog back then, and you can relive the adventure by clicking on "2008" > "August" in the blog history in the right sidebar. But, if you don't want to go through that, here's the graphic overview...  

About a third of the way home, on the northern portion of the loop, we had to hit a small town in the southwest corner of South Dakota to renew our driver licenses, as we were (air quotes) "South Dakota Residents" for purposes of mail delivery, vehicle registrations, voting, etc. When that task was completed we dropped down into Nebraska and stopped for the night in a quaint little town called Cody. The city park there had RV hookups for $5 a night. It also had this view of a beautiful prairie railside grain elevator and water supply. I took lots of pictures. The picture leading off this post has been edited with, you guessed it, Luminar Neo. The original looked like this:


Yeah, a nice tree, but the main subject is the elevator, and the parts of the tree I left frame it perfectly, especially after switching to landscape from portrait. I also dialed up the warmth for a more "golden hour" look.

But, what if we weren't there in August of 2008. What if I wanted you to believe it was, instead, late October of 2008? Using the Landscape and Color tools, and some masking it's easy to bring on an Autumnal look to this image, (can't you just feel the frost in the air?):


Cody, Nebraska 2008 "Fall Edit"  ©Daniel Gauss/Shot On Site

Lastly, maybe we weren't there at all. Maybe we just saw the image in a photography gallery somewhere. An image by the alternate universe Dan Gauss? Multiverse of Madness, indeed! Well, if it's artsy, it's gotta be black and white, no? More Luminar Neo tools, of course.

Cody Nebraska 2008 (Black and White Edit)  ©Daniel Gauss/Shot On Site

Give you some ideas? Why not try it soon.  The Halloween Special Offer expires soon! And remember my Coupon Code: DANGAUSS to save $10 (not sure if it works with promo prices, but it wouldn't hurt to try!)

Posts may contain affiliate links. If you make a purchase through one of these, I may receive a small commission at no increased cost to you. Thanks.

Tuesday, October 18, 2022

It Was the Mother of All Crepuscular Ray Sunsets

Original Fujifilm X-E3 Raw File: f8, 1/800 second, ISO 400. Fujifilm XF 16-80mm f4.0 R OIS WR zoom at 18mm.

Last Saturday, I took a break from the recliner in front of whatever college football game I happened to be watching at the time to grab a snack, or refill my water bottle, whatever. Returning to the living room, I glanced out of the open front door and saw this magnificent photo opportunity.

Now, crepuscular rays are not an uncommon site here in The Land of Enchentment, but this was notably exceptional in that the rays were directed out in all directions, owing to the broken cloud formations, and the elevation of the setting sun.

I grabbed the X-E3 and stationed myself on the front porch for the next half hour or so, snapping picture after picture after picture.

I was hoping to get into the editing later that evening, but life - as it does- got in the way, and I didn't get to it until Monday. The screen grab above is the Fuji RAF raw file I started with when I opened up Luminar Neo and sat, staring at the screen, wondering how I wanted to proceed.

I'd watched a YouTube video a couple days before, by a Luminar ambassador, Jim Nix, edit a very similar image, using some of the seldom used tools in Luminar Neo. That's the direction I decided to go.

While Luminar Neo has a very cool "Sunrays" tool, it was obvious it wouldn't be necessary with this image. But I wanted to really accentuate them, along with the golden hour colors. Recently, I would have run this through the HDR Merge tool, just to see what it would look like, but I decided to forego that step. The tools I did use included the almost obligatory DevelopRAW, NoiselessAI, Structure, Color, Super Contrast, among the usual suspects. The seldom used tools included Toning, and Color Harmony.

The beauty of any of the Luminar platforms is that they are completely non destructive. You can experiment with any number of the tools, jack the sliders up to 100, play with colors, vignettes, details, etc. and in the end if you're not happy you can revert to your original raw file or jpeg and it's completely unchanged, and ready for you to start over. I've been there.

Anyway, without further ado, you're probaby interested in seeing how it ended up after using 12 different tools (some more than once, which is another cool feature of Luminar Neo). Here's the shot: 

"From the Porch", ©Daniel Gauss/Shot On Site

Remember, if you're interested in any of the Luminar products, use the links above, and if you decide to buy, save $10 with my coupon code: DANGAUSS

Till next time.

Posts may contain affiliate links. If you make a purchase through one of these, I may receive a small commission at no increased cost to you. Thanks.


Monday, September 05, 2022

Br-r-r-r-r-ackets!

Upper Gallinas Campground, Gila National Forest. New Mexico, USA  ©Daniel Gauss/Shot On Site

I rarely go out with the express intention of only shooting bracketed exposures. It's been 10 years, in fact. On this one day road trip up to the Black Range in the Gila, it was my main purpose. I wanted to try out the new HDR Merge extension for Luminar Neo with multiple exposures. In the previous post, I tried out its "single image HDR" capabilities with great success.  This image was made up of 5 images, each 1 stop of exposure apart; an average exposure, and +1, +2, -1, -2.   I used several other Luminar Neo tools to complete the image, including layers, sunrays, and atmosphere.  Gotta say, it looks nothing like an image from the early days of HDR. No "clown vomit" here! 

Skylum have announced several more extension releases before 2022 is over, one of which is already here: NoislessAI, and Upscaling will follow shortly.  If you want to find out more about what's happening at Skylum, click on my affiliate links above, or click here.

Monday, August 08, 2022

Autumn is nice in New Mexico, but...

 ...monsoon brings out the very best in photographic opportunities!

Lightning captured from the front porch. ©Daniel Gauss/Shot On Site

Here's what Wikipedia has to say about our monsoon:

"The North American monsoon is a complex weather process that brings moisture from the Gulf of California (and to lesser extent the eastern Pacific and Gulf of Mexico) over northwestern Mexico and southwestern US resulting in summer thunderstorms, especially at higher elevations. Monsoon rains account for 35% to 45% of total rainfall in the desert Southwest"

Thunderstorms mean heavy (but scattered) rain, and more importantly, lightning! Nothing is more satisfying than capturing a great lightning image.  For a long time, before the digital era, nothing was more frustrating than trying to capture a great lighting image! One had to stand in the rain with a cable release in hand, and the shutter dial set on "B"... push the plunger for a set amount of time and hope that a lighting strike occurred when the shutter was open. Lather, rinse, repeat.

With the advent of digital imaging, many cameras of the advanced amateur and pro levels came with an intervalometer setting. One could specify a certain number of exposures, at a specified interval, and the camera would then do the heavy lifting, while the photographer enjoyed a cold beverage in front of the TV. When the storm subsided, the memory card was loaded in the computer, and the hunt for any frames with a lightning strike would begin.  That's how I captured the image below way back in 2011, also from the front porch. To this day, I think this is still the best storm to ever pass over our heads heading West.

Monsoon lightning. ©Daniel Gauss/Shot On Site 2011
This method had it's obvious drawbacks, of course. The number of shutter actuations vs the number of images of lightning was excessive, considering the lifespan of shutters back then.

The solution was having a device that would only fire the camera when there was actually a lightning bolt! These devices did exist then, but for many of us the price was prohibitive- $500 and up.

Then, in 2016, I began to see ads for a device that didn't cost an arm and a leg and promised I'd be able to capture lightning, and a whole lot more! That device was the Pluto Trigger ! It was only $119 then, and it's still $119 today. I bought one, of course, and have been very pleased with it's capabilities, not only for lightning capture, but so many other functions (but more on that in another post). The image at the top of this story was made possible, in part, with the Pluto Trigger. (Follow the link to learn more).

Tuesday, June 22, 2021

Am I Back?

Maybe.  Looks like I've been on vacation for 3 years.  I'm a little rusty on this blogging thing. Look for more photos, and less verbiage... unless I have something really important to say. 

With that, here's another recent photo. (Available on an embossed notecard w/envelope)


Sunset, City of Rocks State Park
Faywood, New Mexico

Edits: Nik HDR Efx Pro