Showing posts with label Skylum. Show all posts

Friday, June 28, 2024

A Purty Pickshur? No, no, no... it's APERTY

Folks, I'm not a "landscape photographer", but I take landscape images. I'm not a "street photographer", but I have taken many images that would be considered "street" photography. I'm not a "nature photographer", but I've shot many'a birds, mammals, reptiles, amphibians, and fish. Fish? maybe I haven't shot a lot of fish. But you get the picture (metaphorically speaking). I'm not one to be defined by labels.  

So, when I say, I'm not a "portrait photographer", I have certainly taken many portrait photos, going back nearly 60 years. But do I make a living as a portrait photographer? Certainly not. But there are those of you reading this, (and I'll make sure you see this and read it), and do I have an exciting bit of news for you! 

And it's called Aperty  It's a brand new editing program from Skylum, the makers of Luminar Neo.  This is no tool added to Luminar Neo, uh-uh, this is a brand spanking new, stand-alone editor, created by Skylum specifically for portrait photographers!

Details can be found in the May press release from Skylum, which you can read in full here, but for you, who are always in a rush, here are the highlights:

Recognizing the increasing demand for time-saving tools in portrait photography that would enable professional and semi-professional photographers to focus on creative growth and client engagement,Skylum is collaborating with renowned portrait photographer Julia Trotti to develop this specialized software solution. Set for release in September 2024, Project “Barcelona” will empower photographers by automating routine face retouching processes through an efficient, AI-optimized workflow that runs locally on the user’s device, making it as easy as applying presets

Designed with the specific needs of portrait photographers in mind, the new app’s key features include:

Skin Toning:  Make subtle changes to the skin tone of specific areas thanks to an accurate facial skin segmentation model; remove the red hue or unify the overall color. On top of that, the new app's state-of-the-art face mesh model provides unique makeup correction capabilities, allowing the application of extra textures like blush, highlight, and contour, and changing the color of lips, brows, and other elements.

Eye Enhancement: Add iris flare, remove redness, and adjust eye shape with a comprehensive suite of tools to perfect a subject’s eyes in portraits.

Teeth Whitening: Ensure radiant smiles with advanced teeth whitening and brightening capabilities.

Makeup Application: Enjoy customizable options for creative makeup styles and colors to compliment any complexion, clothing, or backdrop.

Bokeh Effects: Create stunning depth-of-field effects with the bokeh feature, adding dimension and allure to portraits.

Body Enhancement: Adjust bodily proportions to correct posture and account for unflattering angles,making sure portraits capture subjects in their best light.

Also, not mentioned in the press release: batch editing capability. I know that's important to photographers processing  large numbers of photos!

Intrigued? I know you are. Aperty will be available in September 2024. I don't have pricing right now, but I do know that 1000 portrait photographers who place an advance order right now, can get it for $199! Another thing I do know, is that come September, Aperty is probably going to cost a whole lot more than $199.
Use this here link to be one of the lucky (and quick acting) first 1000.
Don't wait!

In August, I'll be getting a beta copy of Aperty, and will be able to post some of my own edited portraits on this blog, but for now you'll just have to be happy with the two samples supplied by Skylum which illustrate some of the tools that will be part of the suite.

So that's one bit of news from Skylum, but that's not all. Read on...


As far as I know, the Luminar Neo Summer Sale continues! That means great savings are still available on Luminar Neo, and all Luminar Neo related goodies from the marketplace. That also means, that in addition to those great Summer Sale savings, you can save even more, 20% more, to be precise when you use this discount code at checkout: AFF-7ky9M0

What? You're not interested in making great portrait photos, or any great photos? Well someone you know does. Copy this post link and share it with all of your photographer friends. They'll thank you later.

Ciao!

Wednesday, August 16, 2023

Let's Say I Had This Friend....

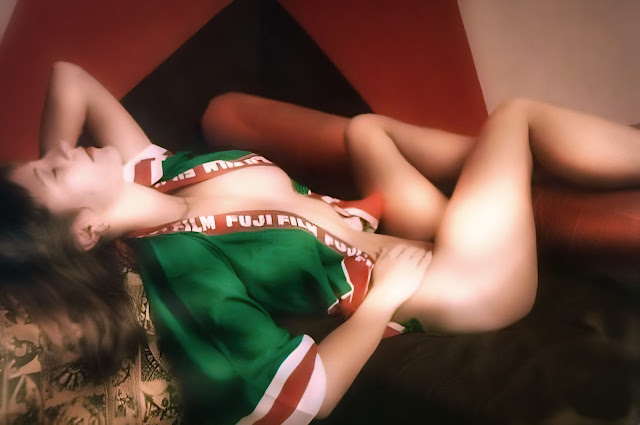
...and this friend, knowing I was pretty good at photo editing, asked if I could do a favor for him. See, this friend is roughly the same age as I am, and like me is into photography (but not quite as seriously as I) and way back (let's say in the mid-to-late 1970s) he took a lot of photos of the, um, boudoir genre.

This... friend wondered if I could use Luminar Neo to improve some of his old images. Well, what kind of "friend" could turn down a request like that? 

When I saw what I was going to be working with, I wondered what I what I'd gotten into. The original prints looked like they had been in  ̶m̶y̶  his drawer for the last 45 years. And they were tiny! 3.5 x 5, silk surface paper, with round corners! Remember those?

And check out those colors! Jaundice city! This was not going to be the easiest project I ever took on. But... I had a secret weapon! Oh yeah, Luminar Neo had all the tools I needed to fix the colors, remove the annoying silk texture, and make a much larger image file using UpscaleAI.. from 40KB to 3MB with the click of a button. I had not done this kind of work, ever, and yet Luminar Neo is so intuitive (and quick) that it was easy to figure out what tools would do what. And of course, if I didn't like a result, it's simple to back out, with no effect on my original image file because as I may or may not have harped on many times, Luminar Neo (in fact all the previous versions of Luminar as well) is a totally non-destructive process. No matter how many changes you make to an image, your original file is untouched. Cool huh?

And then, there was Studio Lighting.  I had, in my possession the beta version of the upcoming feature, Studio Lighting, which will show up in the Portrait Tools on the next update around the end of this month. It allows you to re-create  many dramatic lighting lighting effects heretofore only available using actual, you know, studio lighting.  I actually found this fairly daunting, because there were so many controls and I just had to fiddle around with each one to see what they would do (remember "non-destructive process?" Good thing).

In the end I ended up with a simple "stripe" lighting effect, (think sunlight through vertical blinds). Just the right "punch". Added a simple vignette, and called it "done".  I'm pretty happy with the result. Pretty sure you'll agree, the final image is a far cry from where I started.  This is easily the most accurate color I've gotten from faded and color-shifted old prints or slides. Now that I know what's required, I might work on  more of  ̶m̶y̶  his old photos!

Now, after the image, I'll fill you in on all the exciting new updates and extensions coming this autumn from Skylum and Luminar Neo....

Famous Fujifilm Kimono ©Daniel Gauss/Shot On Site

As I mentioned above, Studio Light will be available on August 31, but you can get early bird pricing for all Luminar Neo platforms starting now through August 27th. Here's the deets:

New purchasers have a choice of:

  • the brand new Pro Monthly subscription, $14/mo
  • Pro 12 Month subscription, $99 instead of $119
  • Pro 24 Month subscription, $139 instead of $179 👈 (Best deal, of course)
  • New Lifetime purchasers (if you'd rather pick and choose your Extensions) $249 instead of $279 (Trust me, the subscription model is the way to go)

If you're an existing Lifetime user, you might want the 2023/2024 Creative Journey Pass for $39 instead of  $79. You will need this to get the next update with Studio Lighting.

There's so much more to come this Fall, and I'll tell you all about it the very next post! But for now, to take advantage of the early bird prices click on this. And remember, to use the code: AFS-rdFDRy at checkout to save an additional 10%! (PHOTODAN may work as well and you won't have to cut and past, or try to remember that first one)

Here's more samples (by other folks) of Studio Lighting tool...


Posts may contain affiliate links. If you make a purchase through one of these, I may receive a small commission at no increased cost to you. Thanks.


Sunday, June 25, 2023

It's Your Choice


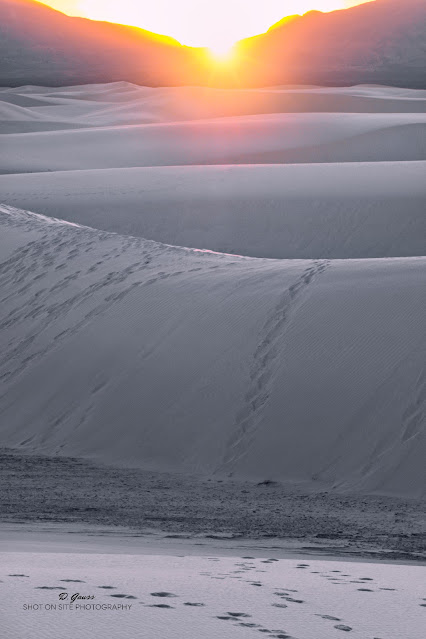
White Sands Golden Hour ©Daniel Gauss/Shot On Site

As a photographer, I tend to classify myself as an "opportunistic generalist". What does that mean? Simply that I'll shoot anything! Landscape, wildlife, street, portrait, pet, event, ruins, whatever. There's a hashtag on social media: "ipulledoverforthis". That's me in a nutshell. That doesn't mean I don't have my favorites, landscape photography being probably at the top of the list.
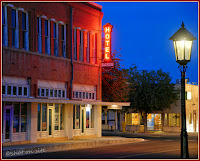
Baker Blue Hour ©Daniel Gauss/Shot On Site
That said, it's uncommon for me to actually plan out a photo shoot. I've done it a few times, possibly the first being the HDR session in downtown Deming, NM that resulted in one of my most commercially successful images (a framed enlargement hangs in a villa in the south of France!), that being the Baker Hotel sign in blue hour. This was planned out weeks in advance. 

But for the most part, I'll just grab the camera and go. Oh, there's a car show in town? I'm on that. Full moon coming up over the mountains in the back yard. I'll shoot that. Look! Look there at that old car in the yard of that abandoned house. Get the shot! 

You getting the picture? 

So anyway, some time back in January, I decided I wanted to shoot the full "Snow" moon rise, and I wanted to use the PhotoPills app to get the right time and location.. and that location was going to be White Sands National Park! In other words, a meticulously planned photo shoot! It happens sometimes.

Photo Bro Dale and I got a late start on February 5, but it didn't matter much... everything we were going for was happening late in the day. The moonrise for me, and a very short time before, the sunset for Dale. I was planning on getting some sunset images myself.

Typically, there wasn't a cloud in the sky when we arrived. We hung around the visitor center for a while, flirting with the ranger on duty, then headed out to stake out our spots. I tried out a couple dune tops, took some basic White Sands landscapes, but I didn't like the way the light was going to act when the sun started to set. I hiked to the hill Dale was set up on about the time the sun began to dip. 

There was still almost an hour before the moon would show itself above the Sacramentos, so I set up my tripod and aimed the camera towards the a notch in the San Andres Mountains where the sun would descend. I decided on portrait mode because it accentuated the layers of dunes between my location and the mountains. Then, well, then I just shot the hell out of it while the sun did its disappearing act.

Being a little unprepared clothing-wise for nighttime in the desert, we decided we couldn't stay where we were to shoot moonrise. We rushed back toward the parking lot to set up there.

But hey, if you looked at the image that leads off this post, you've probably figured out by now that this isn't about the moonrise. It's about the sunset, and what I chose to do with it.  

Back home again the following day, I opened up Luminar Neo on the ol' desktop and commenced to editing. When I got around to the sunset shots, I chose the image at the top of this page. I only needed basic edits.. a little masking to bring out the pinkish tones of the dune ridges, brought up the whites in the develop tool. A very minor vignette to direct the viewer's eye. And that was pretty much it. Or was it?

Revisiting the image a day later, I decided that while it was a nice landscape, it was pretty pedestrian; certainl y not one I would put on a notecard and sell at Readers' Cove (our used book store), or the Arts Center.  But I had a plan...

One of the things I really like about Luminar Neo is that I can create fantasy images, and do it way easier, and more intuitively than with those other guys.  More than a year ago I'd gotten this PNG butterfly layer as a gift from Luminar, for completing a survey or something. I tried it out. I liked it, but I wanted to fill the page more, so I loaded another copy and added it, then flipped it so it wouldn't be an identical duplicate of the first layer. I then lightened up the top third of the layers using the mask tool, so it appears the sun is shining through the wings. I sat back feeling pretty damn satisfied with myself.  When printed on metallic surface paper this should pop! I'll know this week when my latest print order arrives at the Homestead.
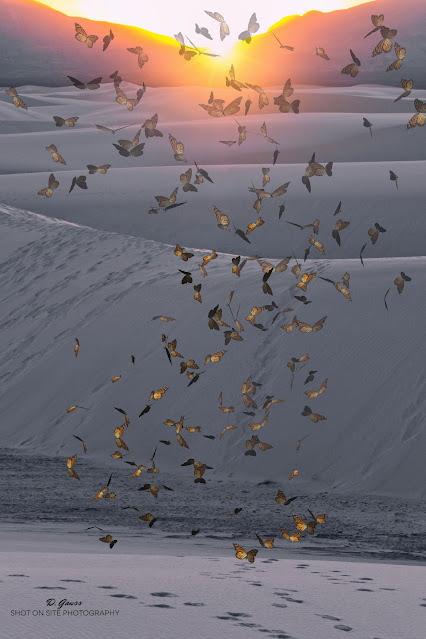


White Sands Golden Hour Fantasy ©Daniel Gauss/Shot On Site

I didn't have to do it this way, but I chose to. It was my choice. You might not do this with your images. I know a lot of my friends have no interest in these flights of fantasy, and that's their choice. Just like it's your choice. What would you do if you had these creative tools at your fingertips?

Right now, is the very best time to find out, because Luminar Neo Summer Sale is on till the end of the month! These are some of the lowest prices since way back at Black Friday in November. There's no risk.Try it, and if you don't love it like I do get your bucks back. And I can sweeten the pot, because I've got a special code you can copy and paste at checkout, and get an additional 10% off! 

Here's the code right here: AFS-rdFDRy

Just click the ad below, or any of the other links in the post to hit the info page. It's time you tried it, guys. Prices probably won't be this low again... new features are coming later this year!


Oh! And what of that full "Snow" moon rise that was the whole purpose of this "Photo Bro's Roadtrip"? I got it. And you can see it on my Instagram, when you  go there to follow me. 😎


Fine Print:
Posts may contain affiliate links. If you make a purchase through one of these, I may receive a small commission at no increased cost to you. Thanks.

Tuesday, May 23, 2023

Ice, I̶c̶e̶ , Land, Baby


Iceland Photo By Matt Hardy


Luminar is again hosting a week long photo expedition to Iceland, a place forever on my bucket list- where it will no doubt die.  But just because I can't afford to take this trip doesn't mean maybe one or two of my followers can't. I know people with the financial means to go, but they're not all that interested in upping their photography game; and I know people who'd kill to spend a week in Iceland with 6 master photographers, but they can't afford to take the trip. Somewhere... somewhere out there is the happy medium: Someone with the bucks, and the desire. This post is for you!

This trip is limited to 36 lucky individuals, and will run from August 24-31.  I'm told there are still a few slots available. You can find all the pertinent details by clicking here 

It's not a lot, but if you decide to take the plunge and sign up for this trip of a lifetime, I can save you $200 off the package price, when you use the code, ICEMANDAN, when you check out.  I envy you!

Friday, January 13, 2023

Happy (Belated) New Year!

Immature Bald Eagle  ©Daniel Gauss/Shot On Site 

This young bird may be experiencing its first new year.  Shot this at Bosque del Apache National Wildlife Refuge on Christmas Day, a trip we've been making nearly every Christmas for the last 6 or 7 years. "The Bosque" is one of America's great wildlife refuges, and should not be missed.

You would think, looking at this image, that I was either very close, or I have one of those massive multi-thousand dollar telephoto lenses. Neither is the case. My lens of choice (currently) for wildlife images such as this is the Fujifilm XF 50-140mm f2.8 R LM OIS WR (a mouthful, right), coupled with the Fujifilm 2x teleconverter. The 35mm equivalent of this setup would be 150-450mm. Decently long, but not enough to get in close to this eagle. Here's the original, uncropped and unedited image (about 50-60 yards away):

©Daniel Gauss/Shot On Site

So... how did I get a nice close (and sharp) image? Well, if you've been coming around here long enough you won't be surprised when I tell you it was in the "digital darkroom" with  Luminar Neo!, and its group of Extensions. (Especially SupersharpAI and UpscaleAI). If you own, or have a subscription to Luminar Neo and you want to try out any of the extensions for free, just click on any of those last 3 affiliate links. To purchase Luminar Neo, click on the first link. And don't forget: if you decide to purchase anything at the Luminar site, use the code: PHOTODAN  for 10% off of your purchase!

I'll be back soon, with more cool content about photography, photo editing, activewear clothing, your feet, and some exciting new medical news. Hang in there.

Friday, November 11, 2022

Luminar Neo Evolution Continues... Better Than Ever

 Here's the official tease. I'll have more on the new extensions very, very soon. Or hit the ad on the right.


Sunday, October 30, 2022

Customizing My Old Images. Because I Can

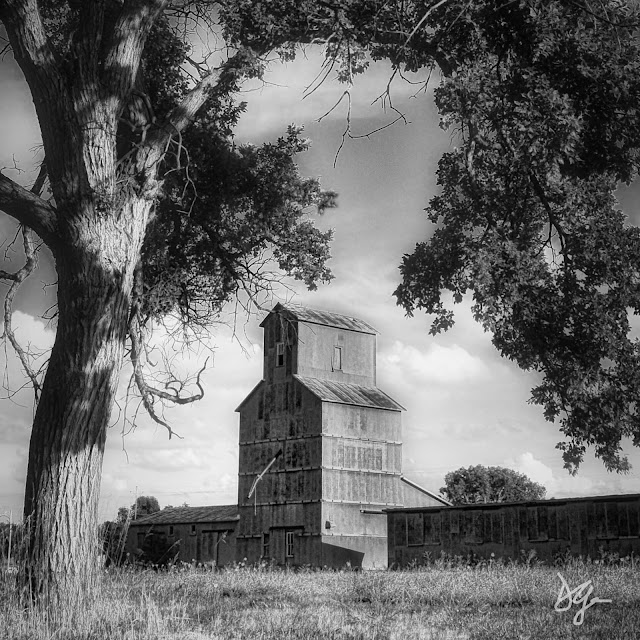
Cody, Nebraska 2008. ©Daniel Gauss/Shot On Site


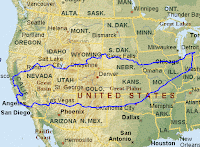
Back in 2008, we embarked on one of our longest trips in the Hare-Brained Express, leaving Ann Arbor, where Margaret's brother installed a new radiator in the Bounder, for the west coast and back again. That trip was chronicled extensively on this blog back then, and you can relive the adventure by clicking on "2008" > "August" in the blog history in the right sidebar. But, if you don't want to go through that, here's the graphic overview...  

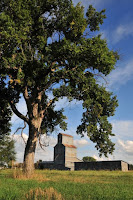
About a third of the way home, on the northern portion of the loop, we had to hit a small town in the southwest corner of South Dakota to renew our driver licenses, as we were (air quotes) "South Dakota Residents" for purposes of mail delivery, vehicle registrations, voting, etc. When that task was completed we dropped down into Nebraska and stopped for the night in a quaint little town called Cody. The city park there had RV hookups for $5 a night. It also had this view of a beautiful prairie railside grain elevator and water supply. I took lots of pictures. The picture leading off this post has been edited with, you guessed it, Luminar Neo. The original looked like this:


Yeah, a nice tree, but the main subject is the elevator, and the parts of the tree I left frame it perfectly, especially after switching to landscape from portrait. I also dialed up the warmth for a more "golden hour" look.

But, what if we weren't there in August of 2008. What if I wanted you to believe it was, instead, late October of 2008? Using the Landscape and Color tools, and some masking it's easy to bring on an Autumnal look to this image, (can't you just feel the frost in the air?):


Cody, Nebraska 2008 "Fall Edit"  ©Daniel Gauss/Shot On Site

Lastly, maybe we weren't there at all. Maybe we just saw the image in a photography gallery somewhere. An image by the alternate universe Dan Gauss? Multiverse of Madness, indeed! Well, if it's artsy, it's gotta be black and white, no? More Luminar Neo tools, of course.

Cody Nebraska 2008 (Black and White Edit)  ©Daniel Gauss/Shot On Site

Give you some ideas? Why not try it soon.  The Halloween Special Offer expires soon! And remember my Coupon Code: DANGAUSS to save $10 (not sure if it works with promo prices, but it wouldn't hurt to try!)

Posts may contain affiliate links. If you make a purchase through one of these, I may receive a small commission at no increased cost to you. Thanks.

Tuesday, October 18, 2022

It Was the Mother of All Crepuscular Ray Sunsets

Original Fujifilm X-E3 Raw File: f8, 1/800 second, ISO 400. Fujifilm XF 16-80mm f4.0 R OIS WR zoom at 18mm.

Last Saturday, I took a break from the recliner in front of whatever college football game I happened to be watching at the time to grab a snack, or refill my water bottle, whatever. Returning to the living room, I glanced out of the open front door and saw this magnificent photo opportunity.

Now, crepuscular rays are not an uncommon site here in The Land of Enchentment, but this was notably exceptional in that the rays were directed out in all directions, owing to the broken cloud formations, and the elevation of the setting sun.

I grabbed the X-E3 and stationed myself on the front porch for the next half hour or so, snapping picture after picture after picture.

I was hoping to get into the editing later that evening, but life - as it does- got in the way, and I didn't get to it until Monday. The screen grab above is the Fuji RAF raw file I started with when I opened up Luminar Neo and sat, staring at the screen, wondering how I wanted to proceed.

I'd watched a YouTube video a couple days before, by a Luminar ambassador, Jim Nix, edit a very similar image, using some of the seldom used tools in Luminar Neo. That's the direction I decided to go.

While Luminar Neo has a very cool "Sunrays" tool, it was obvious it wouldn't be necessary with this image. But I wanted to really accentuate them, along with the golden hour colors. Recently, I would have run this through the HDR Merge tool, just to see what it would look like, but I decided to forego that step. The tools I did use included the almost obligatory DevelopRAW, NoiselessAI, Structure, Color, Super Contrast, among the usual suspects. The seldom used tools included Toning, and Color Harmony.

The beauty of any of the Luminar platforms is that they are completely non destructive. You can experiment with any number of the tools, jack the sliders up to 100, play with colors, vignettes, details, etc. and in the end if you're not happy you can revert to your original raw file or jpeg and it's completely unchanged, and ready for you to start over. I've been there.

Anyway, without further ado, you're probaby interested in seeing how it ended up after using 12 different tools (some more than once, which is another cool feature of Luminar Neo). Here's the shot: 

"From the Porch", ©Daniel Gauss/Shot On Site

Remember, if you're interested in any of the Luminar products, use the links above, and if you decide to buy, save $10 with my coupon code: DANGAUSS

Till next time.

Posts may contain affiliate links. If you make a purchase through one of these, I may receive a small commission at no increased cost to you. Thanks.


Monday, September 05, 2022

Br-r-r-r-r-ackets!

Upper Gallinas Campground, Gila National Forest. New Mexico, USA  ©Daniel Gauss/Shot On Site

I rarely go out with the express intention of only shooting bracketed exposures. It's been 10 years, in fact. On this one day road trip up to the Black Range in the Gila, it was my main purpose. I wanted to try out the new HDR Merge extension for Luminar Neo with multiple exposures. In the previous post, I tried out its "single image HDR" capabilities with great success.  This image was made up of 5 images, each 1 stop of exposure apart; an average exposure, and +1, +2, -1, -2.   I used several other Luminar Neo tools to complete the image, including layers, sunrays, and atmosphere.  Gotta say, it looks nothing like an image from the early days of HDR. No "clown vomit" here! 

Skylum have announced several more extension releases before 2022 is over, one of which is already here: NoislessAI, and Upscaling will follow shortly.  If you want to find out more about what's happening at Skylum, click on my affiliate links above, or click here.