Monday, October 23, 2023

Not Ready For Prime Time? Luminar Neo GenErase; You Be The Judge

"GenErase: next-generation Erase tool that not only removes unwanted distractions from your images, but also intelligently replaces those areas using content-aware AI tools, providing a focused and distraction-free composition. This feature preserves the integrity of your photos by filling in the gaps with textures and other elements using AI to match the surrounding area. GenErase can seamlessly remove objects such as trash, street signs, utility poles, vehicles, graffiti, crowds, and more to preserve the beauty of the composition."

The above description is from the October 20 press release from Skylum Software, makers of Luminar Neo, and describes how the new GenErase generative AI tool performs.

I've been fortunate enough to have access to a beta version of the tool, and some images from Skylum to play with, as well as some of my own images from a local air show this past weekend. (People just can't stop walking into my pictures! A perfect test).

The image above was supplied by Skylum. The boat in the foreground is obviously a distraction. The next image shows the tool UI. Fairly simple, you have a "Select", "De-select", and "Erase" tool which is pretty self explanatory. Select the items you want to remove, De-select if you get a little sloppy, and Erase when you're ready to send your image to the Cloud where all the heavy lifting is done. Depending on your internet (required!) speed and strength, the resulting image will show up in the Generative Creations folder (created when you first use the tool) in a few seconds, or a few minutes. Mine were running about 2 minutes because my internet sucks😏 Below is the resulting "GenErased" image. (On a subsequent use, I got rid of all the little buoys in the background). Looks very good. Click to enlarge, and you won't see the telltale repeating elements you sometimes get with clone and stamp, or the basic Luminar Neo erase tool. Because it's a simple task in this case. Challenge it, and it seems to struggle a bit. (But I do remind myself, this is a beta copy, and the Skylum folks do a pretty good job of  fixing all the bugs when the official releases roll around.)  Below, I'll show you one of my air show results, and will then close with some comedy. Or, Halloween horror. I haven't decided yet.


Okay. I said it was an air show, and it was, but you know I can never resist a car shot. PhotoBro Dale had to lean in a little too close to this gorgeous 1937 Studebaker. Guy walking up in the background annoyed me as well. They had to go. 

I
If you look at the background-left of the resulting image (middle), you can see some weirdly warped artifacts created by the AI. Not too awful, because 1) I was going to use the blur tool on the background, and 2) I was going to crop it. (bottom)

I also just realized that tiny rectangle on the rear fender is not part of the car, as I originally thought, but it probably an artifact from that background dude's shoe. No problem, it can be removed easily with the standard erase tool.

Now, read on for a hilariously scary result...

So, back story: A couple of months ago a long time friend of mine  messaged me and asked what was wrong with Luminar Neo erase tool. He'd been given a picture by a family friend of herself, a deputy, and a third person who was not identified. The deputy (personal bodyguard) was between the two women. She wanted the bodyguard removed from the picture. He'd been trying to use the erase tool. I told him this might be best fixed with a new generative AI tool coming in the Fall, or clone and stamp. He sent me the picture, (with the third person- a celebrity- cropped out. You can just see the edge of her jacket, extreme left corner.) I got the process started with clone and stamp with some success. I think he finished it and was generally satisfied. (I have obscured the faces to protect the identities... handy tool that Blur tool!)


Fast forward to last week when I downloaded the beta version of GenErase, and thought, let's see if I was right. Could I remove the cop? I was very meticulous with the Select brush, carefully avoiding any part of the other subjects in the image, said "here goes", and pressed Erase, thinking how I would crow to my friend how awesome GenErase was going to be.

First my jaw dropped as I stared dumbfounded at the resulting image. I could make no sense out of the content the AI created from presumably whole cloth.

Then I started to laugh, because it was so ludicrous. Finally, my laughter became hysterical as I became ready to swear allegiance to our AI robot overlords, because if it can summon denizens from the Multiverse of Madness to populate our photos, then there is no hope for us and we are doomed!

Just look:


Whaaaaat? Let's just say, I was expecting a completely different result and leave it at that.

Anyway, GenErase is scheduled to go launch on October 26th. It will be available to all subscribers and Creative Journey Pass owners. If you are neither of those, and you want access to all the goodies and tools included in the current version of Luminar Neo, and those to come for the next 12 months just follow this link, and between 7AM (EST)October 28 and  7AM (EST) November 2, save 31% off any purchase at Skylum with the code: NEO31OFF

Trust me when I say, GenErase  will improve with use, because that's how AI works, and all the currently existing tools are well worth the time you'll save, and the images you'll create versus many of the other players out there. Give it a try, RISK FREE!

Posts may contain affiliate links. If you make a purchase through one of these, I may receive a small commission at no increased cost to you. Thanks.

Wednesday, September 27, 2023

Update Extra! Train Time!

Update to Luminar Neo v. 1.14.0 arrived yesterday, so if you're on one of the subscription options you'll have the new Neon & Glow tool, as well as the addition of Tilt/Shift to the Blur tool as soon as you install the update.

Big Boy On Acid (Neon & Glow) ©Daniel Gauss/Shot On Site


Durango & Silverton RR (tilt/shift blur) ©Daniel Gauss/Shot On Site

If you're an existing Lifetime owner, you'll need to purchase the Creative Journey Pass to have access to these updates, and all the extensions and tools to come from now until next Summer! Your other option, of course, is to upgrade to one of several subscription models here.  Remember, there's a bunch of really cool stuff coming, as I wrote about in the previous post.

Don't forget, you can save 10% off whatever you purchase with the discount code: PHOTODAN


Posts may contain affiliate links. If you make a purchase through one of these, I may receive a small commission at no increased cost to you. Thanks.

Thursday, September 21, 2023

Coming Attractions!

Sherri M. ©Daniel Gauss/Shot On Site
The fine folks at Skylum Software, the makers of Luminar Neo are poised to virtually bust a nut with new features this Autumn. The first of these is the already released Studio Light tool, which I've already featured here a couple of weeks back.  I've spent some more time with it, and have refined my technique a little, getting familiar with some of the options. Here's an example from a model shoot we had at the local photo club several years ago, and displays the use of some of the light patterns available. This isn't a tool I anticipate using a lot until it's (hopefully) available for more than human portraits.

Now suppose I was an accomplished graphic artist (I'm not) and I wanted to add some punch to use this already well polished image in, say, some magazine ad copy?(Dream on, Dan).  That's where the Skylum pipeline is ready to shoot out the next new tool. It's called Neon & Glow, and I'm fortunate enough to have been supplied an advance beta copy, to play around with, evaluate, and publicize here. And since there's no embargo on info for this particular tool, I can show you right now.

I must admit, I struggled a bit getting familiar with the sliders and buttons, and how to structure a work flow. I watched a few YouTube videos by some of the Luminar brand ambassadors, and that helped. The first effort started out slowly, while I just threw commands and adjustments and different neon and glow colors at it. I also added several other layers from other tools, and frankly made a mess of it until suddenly it looked like a finished product. Happy accident, but that's the fun of Luminar Neo:

"Flashing Ann Arbor" ©Daniel Gauss/Shot On Site

Funny anecdote here.. these kinds of edits are not everyone's cup of tea, as my friend Bob will attest. I sent this to him, and his reply verbatim: "Cool, art but not photography.  You did that in the computer not in the camera in the field."  Of course, feeling quite contrary, I countered with: "It all begins as photography.  45 years ago, in this case."  What I meant, of course, is that it always begins with a photograph, and this particular photograph is about 45 years old. But I stand by the larger point here, as well.

Anyway, that's neither here nor there. You want to see what I did to bring some pop-sizzle-bang to that photo club shot. Well here you go. This includes Neon and Glow, and one of the native Luminar Neo layers in the Flares collection. Oh yeah, see the sparkles? They're part of the Glow tool.  I like it, and I hope Sherri M. likes it, too (if she sees it!).

Neon Sherri M. ©Daniel Gauss/Shot On Site

So, you've read all the way down here, waiting for the really big Fall news, right? Here you go. Over the next few months, Skylum will by launching several Generative AI tools, which you can get a brief summary of in this press release from August! 

Time to throw some bullet points, samples, and short summaries (lifted from the press release in case, you know, you're too lazy to click the link above).
  • GenErase: A next-generation Erase tool that not only removes unwanted distractions from your images butalso replaces those areas using content-aware tools, providing a focused and distraction-free composition.This feature preserves the integrity of your photos by intelligently filling in the gaps with textures and otherelements to match the surrounding area. GenErase can seamlessly remove objects like trash, street signs,vehicles, graffiti, and more to preserve the beauty of the composition.
  • SceneExpand: This tool enables users to extend the boundaries of their photos, adding a new dimension tooriginal compositions. Whether creating panoramic landscapes or adding breathing room to favorite images,SceneExpand offers the ability to break free from traditional aspect ratios and unlock new creative possibilities
  • SceneSwap: Lets users replace specific elements (such as the sky or foreground) with high-quality AI-generated visuals that blend seamlessly with the rest of the photo. Imagine a stunning sunset replacing thedull, overcast sky or crystal-clear azure waters instead of a murky pond in your photo
  • Water Enhancer: Designed to enhance water features in aquatic scenes, giving landscape photos greatervisual impact
The first three items are the biggies, and the ones causing some consternation, because unlike all previous tools and extensions available, GenErase, SceneExpand, and SceneSwap will require the user to have an active internet connection. Unless you own, oh I don't know, and IBM Watson supercomputer, you'll need a whole lot more computing power than you've probably got. Skylum will use a massive server farm to help you do these edits in a timely fashion. When you see the examples below, you may see why I think this is a reasonable requirement.  So here they are.


SceneExpand
GenErase


SceneSwap
Water Enhancer


Exciting stuff. And if you're lucky enough to be on the Luminar Neo Subscription model, you need do nothing. These will be included in regular updates.  If you own a copy of Luminar Neo, you'll have options to buy these tools either in your account at the Luminar Neo website, or through clicking on the puzzle icon on the upper right of the app.  Or there's another option: you can purchase the Creative Journey Pass for $79 and you'll get all the new goodies, and any still unannounced extensions or tool through August of 2024. Hell of a deal!  And, as always, use PHOTODAN at checkout to save 10%!


Posts may contain affiliate links. If you make a purchase through one of these, I may receive a small commission at no increased cost to you. Thanks.


Friday, September 15, 2023

I Gotta Show You This!

The most recent update of Luminar Neo had a surprise inside! All the hoopla preceding it was about      Studio Light. (Read about that here).  When it arrived it had another new tool; one that I had been quietly wishing existed. Wish fulfilled.  Let me show you.


This screen grab shows a folder of images I took 21 years ago, on a boat tour of the Pictured Rocks National Lakeshore in Michigan's Upper Peninsula.  As you can see from the details box inset, this was taken at a shutter speed of 1/500th second. I can tell you it was also taken from a moving boat. In mid day.

Now just supposing I would have preferred taking a long exposure shot. At sunset.  Well, for starters, I'd need to be set up on a tripod. On firm ground. You can immediately see that I'd have to be in the water, not on a boat. Water that was probably over 20' deep where the boat was. I'd be out of luck.

Or would I? 

Maybe back then I would've been. But not now. What was the surprise tool in the latest update? One that I will be much more likely to use than the Studio Light tool. It's the Blur Tool! It gives you options for Motion blur, Twisted blur (a fun one to be sure), and my personal favorite, for some reason, Gaussian blur. Hello grandpa (not reallty).

So when I discovered the Blur tool, I knew I had to play around with it. What did I do first? I wasn't sure how to use Gaussian blur, and I couldn't think offhand of any images in my files to use the Twisted blur. But Motion blur? Oh yeah, as a photographer of the fastest running hounds on the planet, I had lots of images to choose from. But in the end, I just picked the first promising picture I came across. A shot I just grabbed while walking back from the Smokin' Oldies car show last spring. A ratrod, or more accurately I guess, a rat-jeep of sorts. It was crossing the intersection and that was all I needed.

Some judicious masking, a few basic color edits, and we've got us a jeep making the jump to hyperspace. (or just accelerating through a red light)


©Daniel Gauss/Shot On Site

So now we come to the image selected at the top of this page. I want to fake a long exposure shot where non actually existed. Again, it was Motion blur to the rescue, along with many, many other tools I like to play with. Sky replacement for one. If I wanted a sunset look I needed a different sky. I prefer to use my own skies for most images, but I think this might be one I got from Luminar. Whatever, it's the perfect sky to match the sunset light I created. 

Pictured Rocks, ©Daniel Gauss/Shot On Site

I used MaskAI to select out the water, then the smoothing was done in two parts. First I reduced the structure to nearly zero, but to finally get the flat water look I used Motion blur setting of almost 100.

And clouds move during a several minute exposure, too, don't they? So MaskAI also selects out the sky, and with a combination of the defocus tool in SkyAI, and Motion blur I got the sky right where I wanted it. 

The final step was the trees. I'm surprised I even thought of it, but the leaves don't sit still over a 2 or 3 minute interval, either. They just required the minutest hint of Gaussian blur. You probably wouldn't even notice it if I didn't tell you. 

Contrasting all the moving parts (artificial, though they are) with the crisp sharpness of the unmoveable rock, and we've got us a pretty compelling photo, if I do say so myself.

And what about Twist blur? Glad you asked. I finally found a use for it. See if you can spot it.

Cactus Ernie ©Daniel Gauss/Shot On Site

Surprisingly, Skylum/Luminar Neo don't have any promotions going on right now, but you can still save a whopping 10% if you decide to make a risk free purchase. Just use the code: PHOTODAN at check out. You can reach their website


Posts may contain affiliate links. If you make a purchase through one of these, I may receive a small commission at no increased cost to you. Thanks.


Sunday, September 03, 2023

Classical Composer Reacts To "Pet Sounds"

I've been a fan of the Beach Boys for over 60 years. I've been an occasional follower of The Daily Doug for close to two years. This YouTube channel features classical music composer/educator, Doug Helvering, in a genre known as "reaction videos", wherein experts in one type of music express their reactions to other types of music. For some reason, these are wildly popular. I quite enjoy them myself.

In the relatively short time I've been following Daily Doug YouTube videos he's posted reactions to many of my favorite musicians, including Pat Metheny Group, Frank Zappa, Pink Floyd among others. But it always irked me a little that I never saw a reaction video to any Beach Boys songs or albums.. until last Friday, that is.

While scrolling through YouTube's daily recommendations (something I'm wont to do on a daily basis, as mentioned in a previous post here) a couple days ago, I came to a screaching halt. The Friday edition of The Daily Doug, the extended show where he posts reactions to entire albums, would be devoted to, arguably, Brian Wilson and the Beach Boys greatest album: Pet Sounds. And while I had other things I should have been doing at that time, I sat there watching for the next 51 minutes with the volume at 11.

Surprisingly, Doug admitted to only being familiar with only two of the songs on the album! So while he played the album from start to finish, marveling for the first time at the genius of Brian Wilson (and lyricist Tony Asher), I happily sang along with every tune... even the instrumentals.

So, when was the last time you listened to Pet Sounds? For me, it's been a year or two. Buckle up, it's time.

Saturday, August 19, 2023

I Am Not A Mime...

 ...but I play one in this Baleaf unboxing video.

If you follow this blog religiously, you will remember I wrote about Baleaf's cycling clothing back in November of last year, highlighting their big Black Friday sale. In the interim, I've picked up a few more items from Baleaf, like some new base layer compression shorts sustainably made from recycled plastic bottles. Nice.

So, to bring this up to date, a week or so ago, Baleaf had a 9th Anniversary promotion, where they were offering free shipping on any order (I jumped at that!), and a free gift for sharing "(my) Baleaf journey." I did that, too, because who doesn't like a free gift? Lazy person that I am, I disclosed that I was a Baleaf affiliate, and gave them the link to my previous blog post. 

And they liked it! I got an email from Polly in marketing who wondered if I'd like to try out some other cycling gear and review it on my blog and other social media accounts. Oh, would I! I looked through the offerings, (and more importantly, the sizing charts), and sent my reply: "Here's my size, and I'll leave it up to you what you want to send".

And what I got was the nice... let me get this right... so the package label says: "BALEAF Men's Fleece Running Tights Thermal Cycling Pants Winter Gear Water Resistant Leggings Pockets Black/Green XXL"  that you see in the video up there. 


Now since these are thermal (really niiiiice fleece lining), and the temps here in southern New Mexico are still in the 90s, it might be three or four months before I can give them the proper workout and review that they deserve. I can tell you, the "fit and finish" is perfect, so I can't wait. I pointed out all the little details and features in the video, but if you want the all the pertinent details, colors, sizes, etc, just click on the picture of me just down there 👇

LOL, just kidding! Not about clicking the picture, definitely do that. I can understand if you're confused, but no, that's not me. 

If this item is not to your liking (or gender), just click on any of the other links on this post and it will take you to the Baleaf home page where you can peruse the men and womens (and a few kids) active wear. Cycling, running, hiking, golf, yoga. Excellent quality, way reasonably priced. Fast shipping. Do it. And SAVE 10% when you use DANIELRGAUSS at checkout~

Oh, and I hope you enjoyed the video😆


Posts may contain affiliate links. If you make a purchase through one of these, I may receive a small commission at no increased cost to you. Thanks.


Wednesday, August 16, 2023

Let's Say I Had This Friend....

...and this friend, knowing I was pretty good at photo editing, asked if I could do a favor for him. See, this friend is roughly the same age as I am, and like me is into photography (but not quite as seriously as I) and way back (let's say in the mid-to-late 1970s) he took a lot of photos of the, um, boudoir genre.

This... friend wondered if I could use Luminar Neo to improve some of his old images. Well, what kind of "friend" could turn down a request like that? 

When I saw what I was going to be working with, I wondered what I what I'd gotten into. The original prints looked like they had been in  ̶m̶y̶  his drawer for the last 45 years. And they were tiny! 3.5 x 5, silk surface paper, with round corners! Remember those?

And check out those colors! Jaundice city! This was not going to be the easiest project I ever took on. But... I had a secret weapon! Oh yeah, Luminar Neo had all the tools I needed to fix the colors, remove the annoying silk texture, and make a much larger image file using UpscaleAI.. from 40KB to 3MB with the click of a button. I had not done this kind of work, ever, and yet Luminar Neo is so intuitive (and quick) that it was easy to figure out what tools would do what. And of course, if I didn't like a result, it's simple to back out, with no effect on my original image file because as I may or may not have harped on many times, Luminar Neo (in fact all the previous versions of Luminar as well) is a totally non-destructive process. No matter how many changes you make to an image, your original file is untouched. Cool huh?

And then, there was Studio Lighting.  I had, in my possession the beta version of the upcoming feature, Studio Lighting, which will show up in the Portrait Tools on the next update around the end of this month. It allows you to re-create  many dramatic lighting lighting effects heretofore only available using actual, you know, studio lighting.  I actually found this fairly daunting, because there were so many controls and I just had to fiddle around with each one to see what they would do (remember "non-destructive process?" Good thing).

In the end I ended up with a simple "stripe" lighting effect, (think sunlight through vertical blinds). Just the right "punch". Added a simple vignette, and called it "done".  I'm pretty happy with the result. Pretty sure you'll agree, the final image is a far cry from where I started.  This is easily the most accurate color I've gotten from faded and color-shifted old prints or slides. Now that I know what's required, I might work on  more of  ̶m̶y̶  his old photos!

Now, after the image, I'll fill you in on all the exciting new updates and extensions coming this autumn from Skylum and Luminar Neo....

Famous Fujifilm Kimono ©Daniel Gauss/Shot On Site

As I mentioned above, Studio Light will be available on August 31, but you can get early bird pricing for all Luminar Neo platforms starting now through August 27th. Here's the deets:

New purchasers have a choice of:

  • the brand new Pro Monthly subscription, $14/mo
  • Pro 12 Month subscription, $99 instead of $119
  • Pro 24 Month subscription, $139 instead of $179 👈 (Best deal, of course)
  • New Lifetime purchasers (if you'd rather pick and choose your Extensions) $249 instead of $279 (Trust me, the subscription model is the way to go)

If you're an existing Lifetime user, you might want the 2023/2024 Creative Journey Pass for $39 instead of  $79. You will need this to get the next update with Studio Lighting.

There's so much more to come this Fall, and I'll tell you all about it the very next post! But for now, to take advantage of the early bird prices click on this. And remember, to use the code: AFS-rdFDRy at checkout to save an additional 10%! (PHOTODAN may work as well and you won't have to cut and past, or try to remember that first one)

Here's more samples (by other folks) of Studio Lighting tool...


Posts may contain affiliate links. If you make a purchase through one of these, I may receive a small commission at no increased cost to you. Thanks.


Tuesday, July 25, 2023

Win A Super Light "Killer Whale"... Unless I Do.

 This time I'm definitely going to win! Unless you do..


At the very least, it's fun building your very own custom $11,500 Orbea Orca climbing bike using the customizing tool on the Orbea website. The above is my blue-on-blue design (with the easiest gearing possible, LOL)

Territory restrictions apply (But Europe and North America are OK)

Thursday, July 20, 2023

Now We're Just Showin' Off! Three-Hundred-Sixty Degrees.

Earlier today I installed the most recent version (1.12.0) of Luminar Neo, which included the "official" version of the Panorama Stitch extension.  If you haven't made the plunge just yet, here's good news. The promotional pricing for owners of a lifetime license has been extended a week to July 24. That's $39 for the extension.  If you don't have Luminar Neo in any form, you get to choose if and how you receive the extensions HERE. (Hint: the annual subscription is the best deal) And don't forget to use the code PHOTODAN at checkout to save an extra 10%

Business out of the way, here's how I decided to test out the official version of the extension. I found a video I shot 10 years ago at White Sand National Monument (now a National Park). I was traveling light, so shot it with my little Canon S100 point and shoot camera, and I turned a complete circle, meaning the video covered 360°!

I was not prepared for the decrease in processing and saving speed over the beta versions I had been using. From loading to saved image took less than 2 minutes. A few more minutes of editing and I had the final image you see below. 

White Sands (in the round) 2013 ©Daniel Gauss/Shot On Site

You'll have to wait a little longer for the demo of the really cool trick you can do with video clips. I either have to shoot it myself, or find a sample at the Skylum Software site, but trust me, it will be worth the wait!

Posts may contain affiliate links. If you make a purchase through one of these, I may receive a small commission at no increased cost to you. Thanks.


Monday, July 17, 2023

Panoramas From Video Clips? You Bet Your Life!


Watch this video. I shot this Sunday night with my phone, a refurbished Samsung Galaxy S10 I picked up 2 years ago from the fine folks at Back Market. Check 'em out if you hate new phone prices as much as I do.  


Anyway, the sunset was looking pretty colorful, and I needed a video so that I could demo one of the cool video tools available in the upcoming Panorama Stitch extension for Luminar Neo.  I did about a 13 second left to right sweeping pan of the western horizon, beginning at Dragon Ridge and finishing at the big mesquite tree in my yard, around a 90° angle of view.  It looks ok by itself, but what if I wanted to make a still panorama image. Well, of course I wanted that, why else would I be sitting here typing this?

I'm not going to go over the convoluted, circuitous procedure I went through to get this clip from the phone to my video folder on the desktop (it was too big to email to myself). I'll just say there were moments I wanted to punch a hole in the monitor, and leave it at that.

Once I had the video clip in the same account as the beta2 Panorama Stitch extension, it was simply a matter of dragging the whole clip to the Pano stitch window, and go through the same steps as if you were stitching several still images, except in this case, the program is looking at hundreds of frames. Once it's processed and cropped and saved, (and edited, of course), you get this:

Sunset, July 17, 2023 ©Daniel Gauss/Shot On Site

Is that not sick?? That blew my mind.  To think that I can take a video clip of just about any length, and turn it into a basically flawless panorama still image.  This is next level stuff, folks. And that's not the best part.

Is this the really cool video function I promised in the previous blog post? No, it is not. As cool as this is, it's not nearly as cool as what I'll be able to show you once the official production version of the Panorama Stitch extension is released, (and don't forget, you can save $10 if you order before Thursday, July 20).  

Can you guess what the next feature is?

Anyway, here are your purchase links again:

If you want to get your very own copy of Luminar Neo with all the great extensions, click HERE.

If you already own Luminar Neo, and want to pre-order the Panorama Stitch extension for $39 (It will be $49 on July 20), click HERE.

Current subscribers will get the extension as part of their regular subscription price.

Posts may contain affiliate links. If you make a purchase through one of these, I may receive a small commission at no increased cost to you. Thanks.


Friday, July 14, 2023

Panorama Stitching Like Never Before!


Pretty awesome this Panorama Stitching extension.  The images below were made from very old pano shoots. Kilbourne Hole (a Maar volcano crater, 1.5 miles by 2.1 miles and over 400 feet deep, and part of Organ Mountains/Desert Peaks National Monument), below, dates back to my Nikon days, and consists of 5 landscape format images. Hand held if I'm not mistaken. Back in the day, I made the pano with Photoshop Elements. It did a passable job, but was no where near as streamlined as this Luminar Neo image. Simple as loading the 5 images into the app, select them all, drag them into the Panorama Stitch window, press "Start", wait 10 or 20 seconds, and you get a pano ready for cropping, saving, and editing (if needed).

I wouldn't be me if I didn't add miscellaneous bits and bobs to my images. It's only been 3 or 4 days, but I already forgot (without looking at the original images) if this was the original sky, or if I added it because I hate an empty sky.. I think I added it. I definitely added the Red-tailed hawk😆

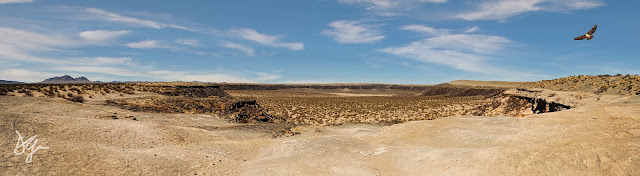
Kilbourne Hole ©Daniel Gauss/Shot On Site

Back in 2015, we made two amazing sightseeing trips into Mexico led from The Pink Store in Palomas, just across the border. One of the stops was the Hacienda de San Diego, below, one of dozens built and owned by "The Rockefeller of Mexico", Don Luis Terraza whose ranch was so big (7 million acres!) that when asked by someone if his ranch was in Chihuahua, replied, "No... Chihuahua is in my ranch".

This is the simplest pano on this post. Simply 3 handheld, horizontal images, taken up close with a very wide angle lens, which accounts for the curved image. The "experts" will tell you not to use wide angle lenses for panoramas for this very reason. However, I like the way it turned out. Side note: the muted pastels come from using one of Luminar Neo's awesome presets, this one called: Travelogue.

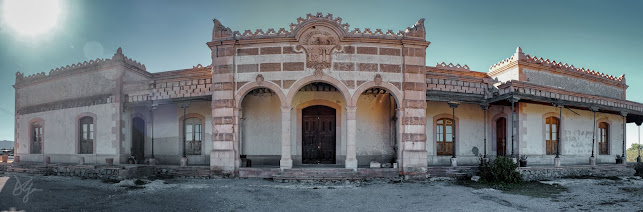
Hacienda de San Diego, Chihuahua, Mexico ©Daniel Gauss/Shot On Site

Holy Warthogs! Did I do that?? 

In 2018, Photo Bro Dale and I hiked up from Mahoney Park on the west side of the Florida Mountains. I think it was to limber up for an upcoming hike near the Gila Cliff Dwellings that turned out to not be quite as strenuous as we'd feared. Anyway, we hit this notch that looked out on the great flat flood plain that is Lewis Flats.  I found a suitable location and took 3 portrait format images to stitch into a pano. Again, the the process was much smoother than the original Adobe effort. So much so that I had extra time to add in the A-10 Thunderbolt "Warthog", just for fun. (It came from the Photo Bro's trip to a local airshow last year.)

I had to replace the sky of necessity. The sky in the  third (right hand) image was totally blown out by the sun. There was no way to retrieve any detail. A problem? Sometimes, but not this time. New sky, problem solved.

Up The Floridas ©Daniel Gauss/Shot On Site

I should point out now, if I haven't already, that I'm using pre-release beta versions of the Panorama Stitch extension. Those first three images were made with the first beta version I received from Skylum. As I've said, they all were made without a single hiccup, from existing, older, photo sets.

It was time to test the extension with some photographic heavy lifting. It was also time, against my better judgement, to brave our 105°F temps and capture my view from the yard in panoramic fashion. I set up the tripod at the fence, put the camera (Fujifilm X-T2, in raw shooting mode) on the tripod in vertical (portrait) orientation, and working left to right, fired off 20 48Mb RAF raw images. (I did make one critical error, but more on that later).

Back in the office, I loaded the 20 images into Luminar Neo, dragged them to the Pano Stitch window, and pressed: "Start".  Since all my other images were just a few jpegs I figured it would take a little longer for the magic to happen this time. And it did.. around 5 minutes in fact. I cropped the edges, was happy with the result, and hit "Save".  The little wheel started turning, and the word "Processing" appeared.  And the wheel kept turning... and turning.  After about 15 minutes I decided to go in the house and have lunch. I came back about 45 minutes later and the wheel was still going round and round and Luminar Neo told me it was still "Processing". At that point, I bailed out of the program, and prepared my feedback to the developers. In my notes I told them I gave the extension a 4/5 rating because of the failure with the raw file pano save function.

A day later I heard from them, and they wanted to see the raw files so that they could diagnose the issue. I spent an entire day on two different machines and two different internet providers trying to upload an 800Mb zip file to Skylum. Without success. 

As luck would have it, the following day, I received an email with a link to an "improved and updated" Pano Stitching beta!  I loaded it up as fast as my rural internet (TWN Communications) could handle it.. about 180 minutes for a 1.8GB zip file.  As soon as I opened the new beta, I loaded up the same 20 raw files, stitched them up, cropped, and hit "save", and waited. And I didn't have to wait long! My saved panorama showed up in the Panorama Stitch folder in about 5 minutes! So glad I don't have to figure out how to upload those files after all. And my latest feedback to Skylum? 5/5

Floridas North End in 120° ©Daniel Gauss/Shot On Site

Now, about that little mistake I made. I shot the 20 pictures in aperture priority. With this many images I should have shot in full manual, so I had a few different  shutter speeds which caused portions of the final image to be darker, specifically about a quarter of the left side. Can you see it?  You can't, can you? Because of the incredible, intuitive nature of the Luminar Neo platform it took only a few tools to fix my lighting. And of course, even though the original image had some nice clouds in the sky, I had to use a replacement over the dark portion of the sky. A small price to pay. That final image above covers about 120° angle view. I like it.  (You can see a screen shot of the post crop, pre-save image at the very bottom of this post)

If you want to get your very own copy of Luminar Neo with all the great extensions, click HERE.

If you already own Luminar Neo, and want to pre-order the Panorama Stitch extension for $39 (It will be $49 on July 20), click HERE.

And guess what? If you're a current subscriber to Luminar Neo, you don't have to click anywhere. It's already included with your subscription! It will be available on the 20th.

Don't delay, get it today!  Oh wait! I'm not done yet. Once the official release happens, I'll have a post here showing what amazing things Panorama Stitch extension can do with video clips! Yes, I said video clips, holy moly!! I've seen samples, and they're just insane!

Posts may contain affiliate links. If you make a purchase through one of these, I may receive a small commission at no increased cost to you. Thanks


Wednesday, July 12, 2023

I Can Finally Get Photoshop Elements 2018 Off My Computer!

 I'll have a full post about this soon, but I wanted to get the news out there as quickly as possible.. 

The latest Extension to the Luminar Neo edit platform is: Panorama Stitching!

I'm excited about this one. The only reason I was hanging on to PS Elements was for this function. I've been playing around with a pre-release beta version and I tell you,  it's smooth, and surprisingly fast, especially with jpegs.  

Anyway, here's the official press release with the deets. Links to pre-purchase below.


If you're a purchasing Luminar Neo for the first time, go HERE

Existing owners or subscribers use THIS LINK

As I said I'll have my samples in a new post real soon.


(Post contains affiliate links)

Tuesday, July 04, 2023

The Long and Short of It. (and an Independence Day Special!)

Ten Mile Cloud ©Daniel Gauss/Shot On Site

Both of these images were taken last night around sunset. They both began life as Fujifilm RAF raw files. But here's the difference. I edited the top image using the Essential tools in Luminar Neo, primarily Develop Raw which includes the usual tools you'd expect: exposure, shadows, highlights, curves, and so on, then added Structure (but only to the foreground, using brush mask), and Color to give some emphasis to the sunset colors, along with a slight bump of golden hour slider in the Landscape tool, and finally a vignette to complete the use of Essential tools. The entire edit took a little over 20 minutes.

But what if you're someone who'd rather be out and about taking pictures, and don't want to sit hunched over your keyboard, staring at the monitor, fiddling with sliders and keystrokes, and layers this and layers that? You're not a "professional" (or maybe you are, whatever). You just like to take pictures and you want them to look their best without wasting a lot of time with the technical stuff. Read on...

The bottom image took about 90 seconds from start to finish. One click on one of the Presets that are included with Luminar Neo... in this case I picked the "Clear and Sharp" preset from the "Essential Presets" pack. One click and it was near perfect. I opened the Develop tool and lifted the foreground shadows slightly, then painted a bit of extra Structure into the mountains. I opened the EnhanceAI tool and moved the slider just enough to activate the Sky slider to pop the clouds. Finally put in my "DG" signature layer and it was done. A completed edit in under 2 minutes. What's not to like? How about this: if you have several similar images taken at the same time, you can just right click on the edited image, select "copy adjustments", then highlight the new images, right click, select "paste adjustments", and Voilà! You might want to make some minor adjustments, but for the most part all your other images are edited, and ready to share to your online platforms, sent to the printer, or whatever floats your boat.

Now, jump below for a news flash...

Floridas ©Daniel Gauss/Shot On Site

 The Luminar Neo Summer Sale may be over, but that doesn't mean there's not another super offer out there.  Maybe some of you are aware that Skylum, the company behind Luminar Neo is located in Kiev, Ukraine. The fact that they can keep putting out this fantastic product and keep it updated in the middle of a war is nothing short of amazing. Obviously, independence is near and dear to them. They're also aware that it's our Independence Day in America, and in that spirit we have an Independence Day Promotion! 👈 (that's the link!). Get the Ultimate Plan Subscription for only $39 for the first year (rebills annually at $119). This price also includes 2 gift Preset Packs (remember what you learned about the Presets up there!☝).  I'm not sure if you can save an extra 10% with my checkout code, but it's certainly worth a try, right? Here it is: PHOTODAN

This promotion ends on Thursday morning (the 6th) at 7AM EDT!


Posts may contain affiliate links. If you make a purchase through one of these, I may receive a small commission at no increased cost to you. Thanks.