Friday, September 30, 2022

Money Money Money Money..... Money (hum it with me)

Just a quick addendum to yesterday's post on the new Luminar Neo pricing programs. You can take an additional $10 off, using my personal discount code: DanGauss  if you purchase a 1 year subscription of either Pro or new Explore!  You're welcome.


BONUS POST:

And here's a teaser of an upcoming extension-


I've been looking forward to this one more than any other so far! It will mean new life for so many of my old photos from the days of tiny sensors! More when the release date gets closer, some time in October.


Posts may contain affiliate links. If you make a purchase through one of these, I may receive a small commission at no increased cost to you. Thanks.


Thursday, September 29, 2022

News Flash!

Forest Altar, ©Daniel Gauss/Shot On Site

I swear, I'll have other product mentions on this blog eventually, but first I have big Luminar Neo news! The folks at Skylum have announced some new levels of pricing, and introduced the Explore Plan. It's a slimmed down version of Luminar Neo at a very attractive price. There is also limited time reduced pricing on the other Luminar plans. If you've been "Luminar-curious", this is your opportunity. Find out all about it at this link

The above image took about 10 minutes time in Luminar Neo, using just a couple of tools. Below you can see the before/after, from the original Fujifilm RAF (raw) file, to finished image. Impressive.


Posts may contain affiliate links. If you make a purchase through one of these, I may receive a small commission at no increased cost to you. Thanks.

Wednesday, September 14, 2022

Bring da Noize.... outta here.


If you're like me, you have many older images that maybe weren't shot in the most ideal of conditions.  Fast action in low light forces you to jack the ISO way up, and that "brings da noize", so to speak. And noting look worse than a noisy photo. Did you know it's possible to eliminate most of that noise with a single click of a mouse? Check this out: (click to play GIF, then make FULL SCREEN)


This is the latest extension tool from Luminar Neo, called NoiselessAI. I intentionally shot this image at the highest ISO my Fujifilm camera was capable of in RAW, 12,800. As you can see, it's annoyingly noisy! If you follow my cursor on the GIF, I simply click on Noiseless in the right column, which opens the tool. The AI then analyzes the image and suggests (you can always disagree!) Low, Medium, or High level of noise removal. In this case, High was the obvious suggestion, and my choice. When done, Neo will display the image at an increased magnification and you can toggle the eyeball to see the before and after. How cool is that?  

I should note that in the above example, I didn't use any other Luminar editing tools, only the NoiselessAI. You have, of course, all of the other tools available to make this the best possible finished image. The images below were finished with other tools after the noise was removed.

Below, I'll post a few more before and after images; some using Medium some High, and some Low.


...and the full image:

©Daniel Gauss/Shot On Site

Next: (before applying NoiselessAI)

©Daniel Gauss/Shot On Site

..and after:

©Daniel Gauss/Shot On Site


NOTE: Posts may contain affiliate links. If you make a purchase through one of these, I may receive a small commission at no increased cost to you. Thanks.


Monday, September 05, 2022

This On Your Bucket List?

Are you a photographer? Have you ever had a hankering to go to Iceland and capture the mind blowing images available there? What if you could do that in the company of some great photographers. Best of all worlds, right?  It's not cheap, but it's available here, with a limited time early bird discount. Check it out!

©Sam Kolder


Br-r-r-r-r-ackets!

Upper Gallinas Campground, Gila National Forest. New Mexico, USA  ©Daniel Gauss/Shot On Site

I rarely go out with the express intention of only shooting bracketed exposures. It's been 10 years, in fact. On this one day road trip up to the Black Range in the Gila, it was my main purpose. I wanted to try out the new HDR Merge extension for Luminar Neo with multiple exposures. In the previous post, I tried out its "single image HDR" capabilities with great success.  This image was made up of 5 images, each 1 stop of exposure apart; an average exposure, and +1, +2, -1, -2.   I used several other Luminar Neo tools to complete the image, including layers, sunrays, and atmosphere.  Gotta say, it looks nothing like an image from the early days of HDR. No "clown vomit" here! 

Skylum have announced several more extension releases before 2022 is over, one of which is already here: NoislessAI, and Upscaling will follow shortly.  If you want to find out more about what's happening at Skylum, click on my affiliate links above, or click here.

Monday, August 08, 2022

Autumn is nice in New Mexico, but...

 ...monsoon brings out the very best in photographic opportunities!

Lightning captured from the front porch. ©Daniel Gauss/Shot On Site

Here's what Wikipedia has to say about our monsoon:

"The North American monsoon is a complex weather process that brings moisture from the Gulf of California (and to lesser extent the eastern Pacific and Gulf of Mexico) over northwestern Mexico and southwestern US resulting in summer thunderstorms, especially at higher elevations. Monsoon rains account for 35% to 45% of total rainfall in the desert Southwest"

Thunderstorms mean heavy (but scattered) rain, and more importantly, lightning! Nothing is more satisfying than capturing a great lightning image.  For a long time, before the digital era, nothing was more frustrating than trying to capture a great lighting image! One had to stand in the rain with a cable release in hand, and the shutter dial set on "B"... push the plunger for a set amount of time and hope that a lighting strike occurred when the shutter was open. Lather, rinse, repeat.

With the advent of digital imaging, many cameras of the advanced amateur and pro levels came with an intervalometer setting. One could specify a certain number of exposures, at a specified interval, and the camera would then do the heavy lifting, while the photographer enjoyed a cold beverage in front of the TV. When the storm subsided, the memory card was loaded in the computer, and the hunt for any frames with a lightning strike would begin.  That's how I captured the image below way back in 2011, also from the front porch. To this day, I think this is still the best storm to ever pass over our heads heading West.

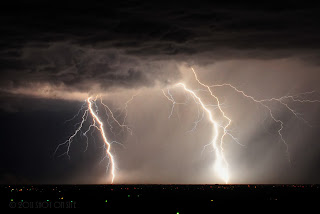
Monsoon lightning. ©Daniel Gauss/Shot On Site 2011
This method had it's obvious drawbacks, of course. The number of shutter actuations vs the number of images of lightning was excessive, considering the lifespan of shutters back then.

The solution was having a device that would only fire the camera when there was actually a lightning bolt! These devices did exist then, but for many of us the price was prohibitive- $500 and up.

Then, in 2016, I began to see ads for a device that didn't cost an arm and a leg and promised I'd be able to capture lightning, and a whole lot more! That device was the Pluto Trigger ! It was only $119 then, and it's still $119 today. I bought one, of course, and have been very pleased with it's capabilities, not only for lightning capture, but so many other functions (but more on that in another post). The image at the top of this story was made possible, in part, with the Pluto Trigger. (Follow the link to learn more).

Friday, December 24, 2021

An Annual Holiday Greeting...


Thanks to Union Pacific Railroad #844 which rolled through Deming, New Mexico in November of 2011, in celebration of the New Mexico Centennial (January 2012), Luminar AI software from Skylum, several free holiday-themed overlays from the internet, and festive text fonts from PicMonkey.com!